Safer injection of anabolic steroids
17 February 2022
This article is written for people who use testosterone and anabolic steroids by injection and for health professionals who treat them in the course of their work. The purpose of this article is to reduce the potential harm resulting from injecting anabolic steroids. Read more about the risks of muscle injections. If, despite the potential harm and risks, you have decided to start injecting anabolic steroids, this guide will help you do so as safely as possible. Using anabolic steroids is never completely risk-free. You can read more about doping substances and their risks here.
DON’T FORGET: substances bought on the black market always present a risk. You can never be sure of the purity, the active ingredients or the strength of the substance.
Always inject into the muscle, never into a vein or subcutaneous tissue.
- Do not inject through irritated skin or into irritated muscle.
- Do not inject near the eyelids.
- Avoid injecting in areas with tattoos, especially if it is a recent tattoo (less than 1 month old).
Remember to rotate injection sites due to the risk of tissue damage. A larger muscle allows a larger dose to be injected. Even then, it must be no more than 2 ml at a time. The muscles recommended in this guide are large enough and present less risk of hitting large nerves or veins. Avoid injecting into other muscles.
You can get new, clean needles and other injection equipment for free (in Finland) from a needle and syringe exchange point . Some pharmacies sell injection equipment. There are also several websites that sell care products online.
Picture: Printable quick guide for safer injecting (PDF, click on picture to open file, print double-sided, select ‘flip on short edge’).
Click on the headings below for instructions
Always pay attention to what you are doing and remember to be careful. Never inject anabolic steroids while under the influence of intoxicants. Don’t forget to always wash your hands with soap before preparing to inject. To reduce the risk of infection and hepatitis, never re-use or share needles and syringes with other people.
Use new, sterile equipment for each injection and make a visual check of:
- the condition and cleanliness of the product,
- the label (date, active substance, strength) and
- the contents (whether there are fragments of broken glass or plastic, discolouration, precipitates or other abnormalities).
If the product looks suspicious, reconsider whether it makes sense to use it.
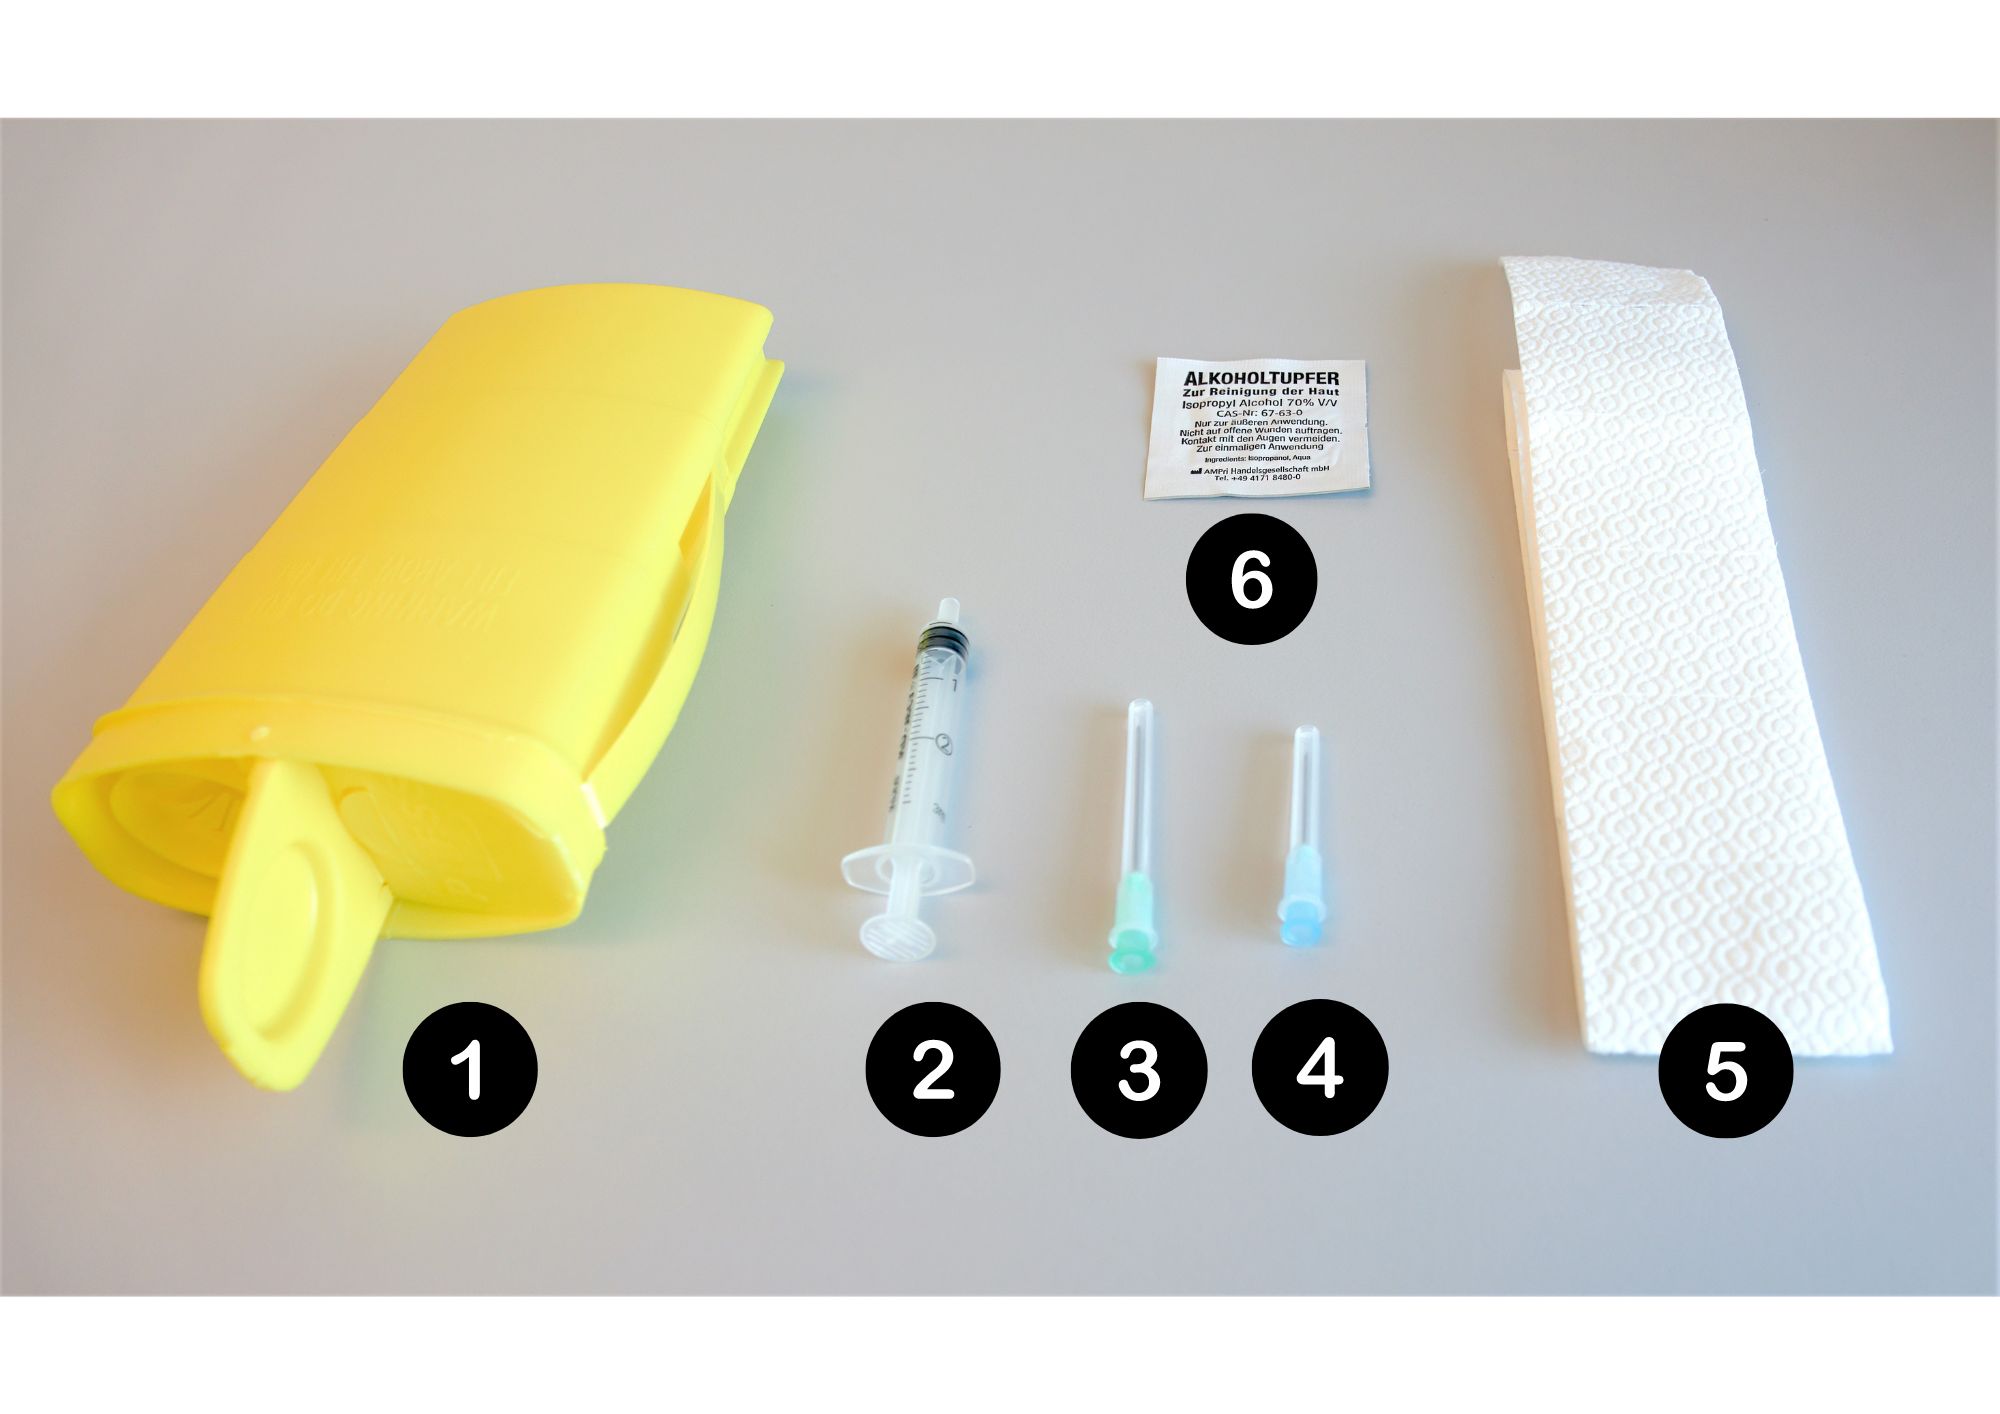
Picture: Equipment needed for an injection into a muscle.
Make sure you have all the equipment you need ready for a muscle injection:
1. Biohazard container. A plastic or glass bottle with a lid will also do. Do not put needles, syringes or other injection equipment in a normal rubbish bin or anywhere else where they could harm others.
2. A sterile 2–3 ml syringe.
Two sterile needles. Do not use the same needle for both drawing up and injecting the substance. The needle may become blunt and fragments of glass or plastic may remain in it. The needle size is marked in G (gauge) or in millimetres. The greater the gauge number (G), the smaller the diameter of the needle.
3. One drawing up needle, 18–23 G (1.2–0.6 mm), to draw the substance from the ampoule or vial.
- For example, a 21 G green needle (outer diameter 0.8 mm).
- You can use a filter needle for water-based products. It prevents any fragments of glass or rubber from entering the syringe. Filter needles are not recommended for oil-based preparations.
4. One injection needle, 20–25 G (0.9–0.5 mm), to inject the substance into the muscle.
- For example, a 23 G blue needle (outer diameter 0.6 mm).
5. A piece of cotton wool or some clean tissue.
6. Alcohol swabs.
If the product has been kept in the fridge, take it out into room temperature, or warm an oil-based anabolic steroid in warm water before injecting it to make it more fluid. Prepare the injection site and equipment carefully before injecting. For example, place the equipment on a clean cloth on top of a clean, well-lit table.
Drawing the substance from an ampoule
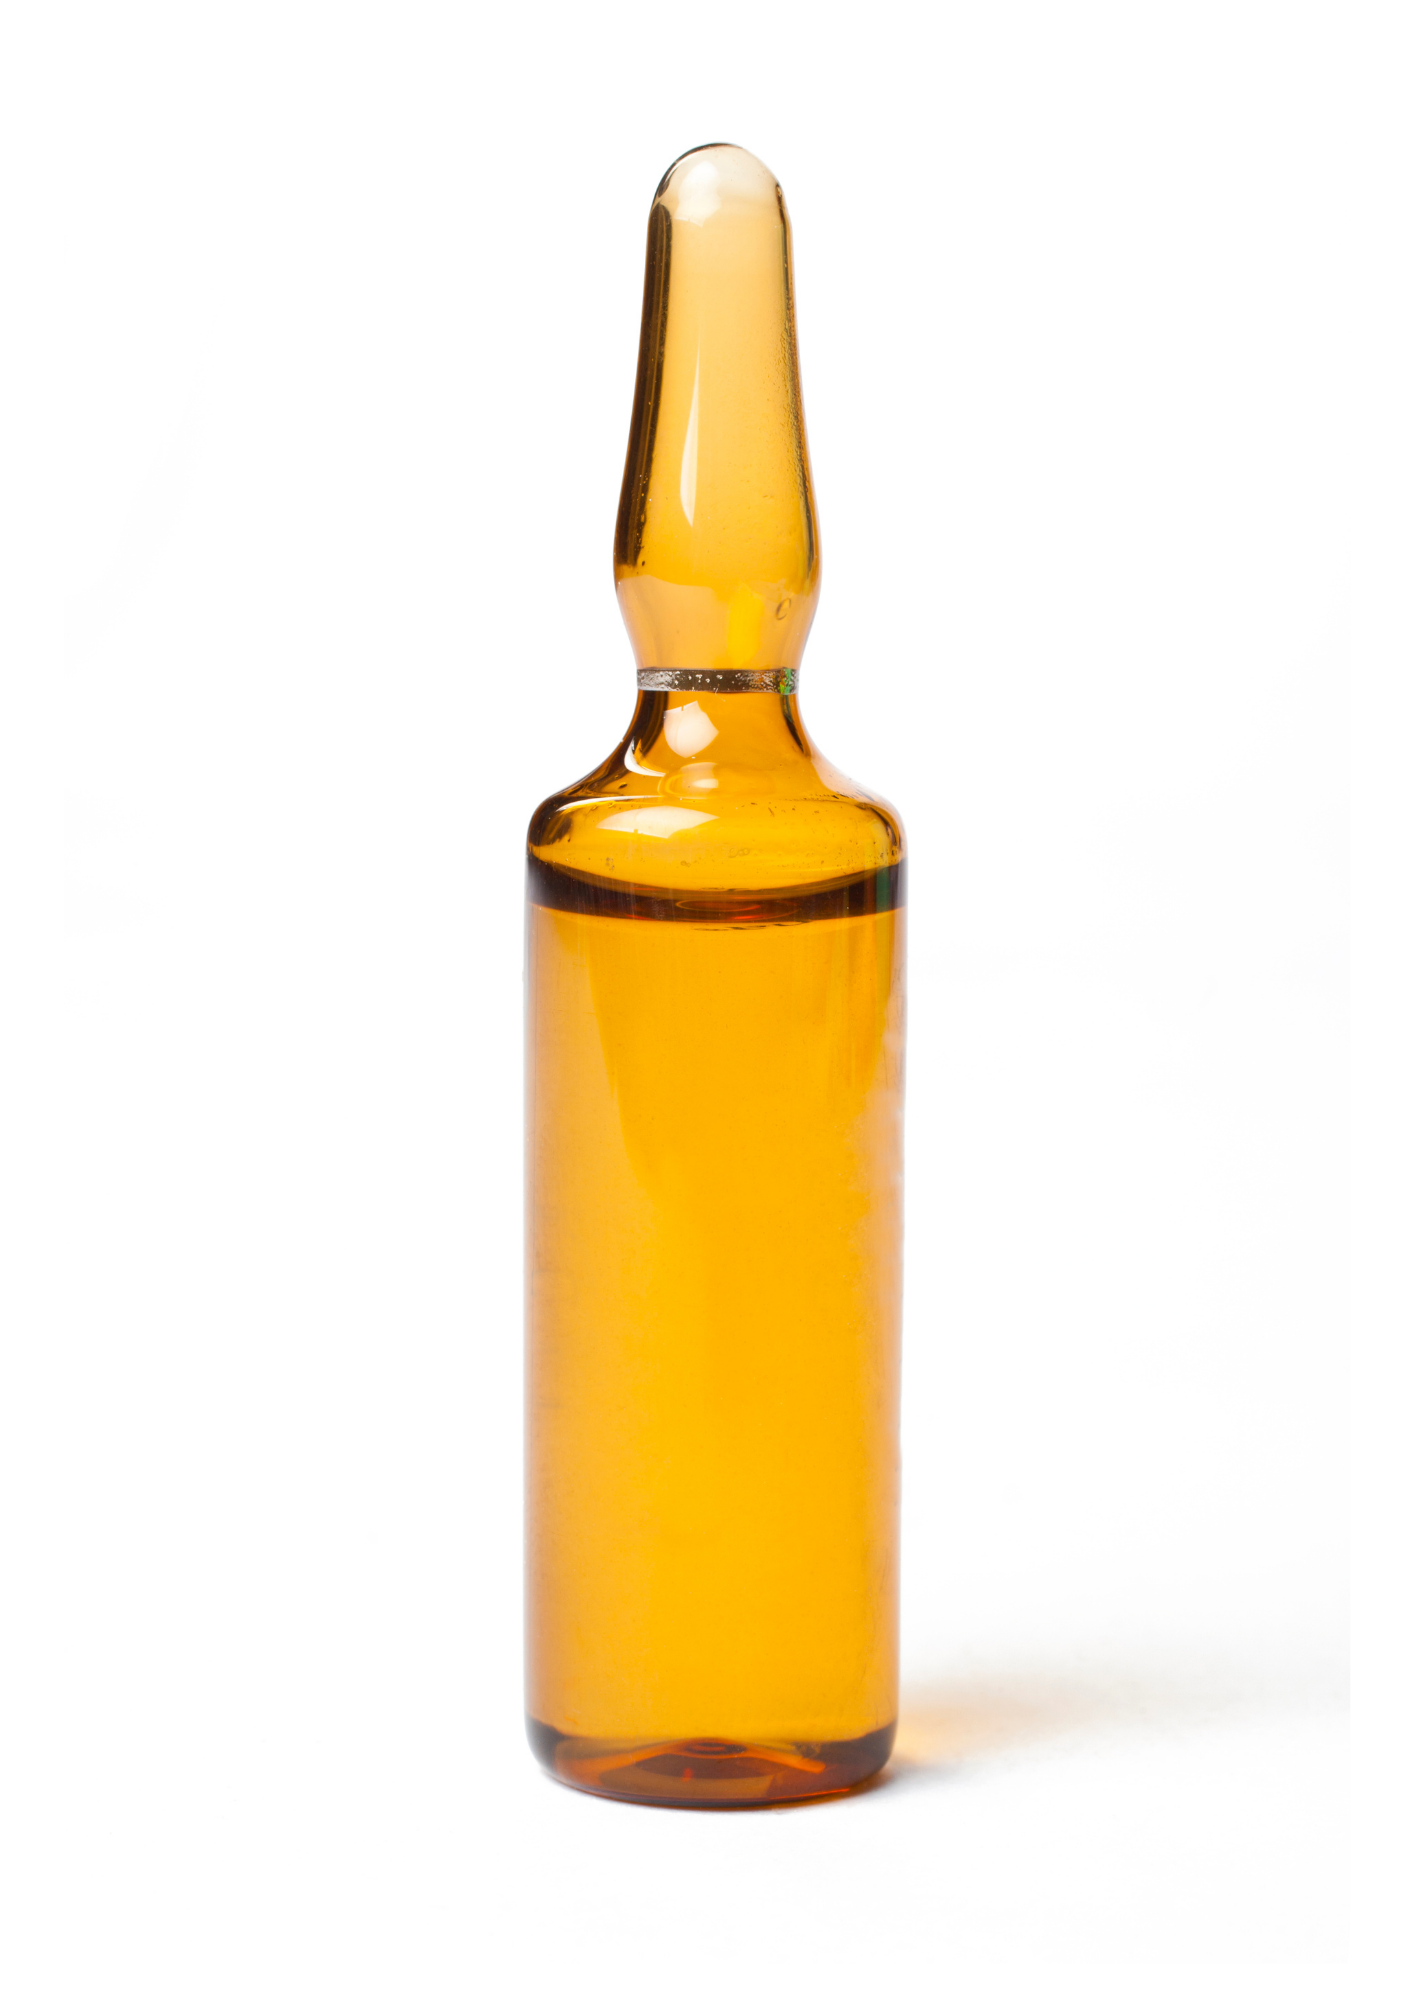
Picture: disposable ampoule
- An ampoule is a small, sealed and disposable glass bottle.
- Do not store the contents of an opened ampoule.
Stages
1. Gently shake or tap the ampoule with your finger. This makes the substance fall to the lower part of the ampoule.
2. Disinfect the neck of the ampoule with an alcohol swab.
3. Open the ampoule using a dry cloth or piece of tissue by breaking open the neck of the bottle at the marked spot as if snapping a twig. Be careful not to cut yourself. You can also use an ampoule opener.
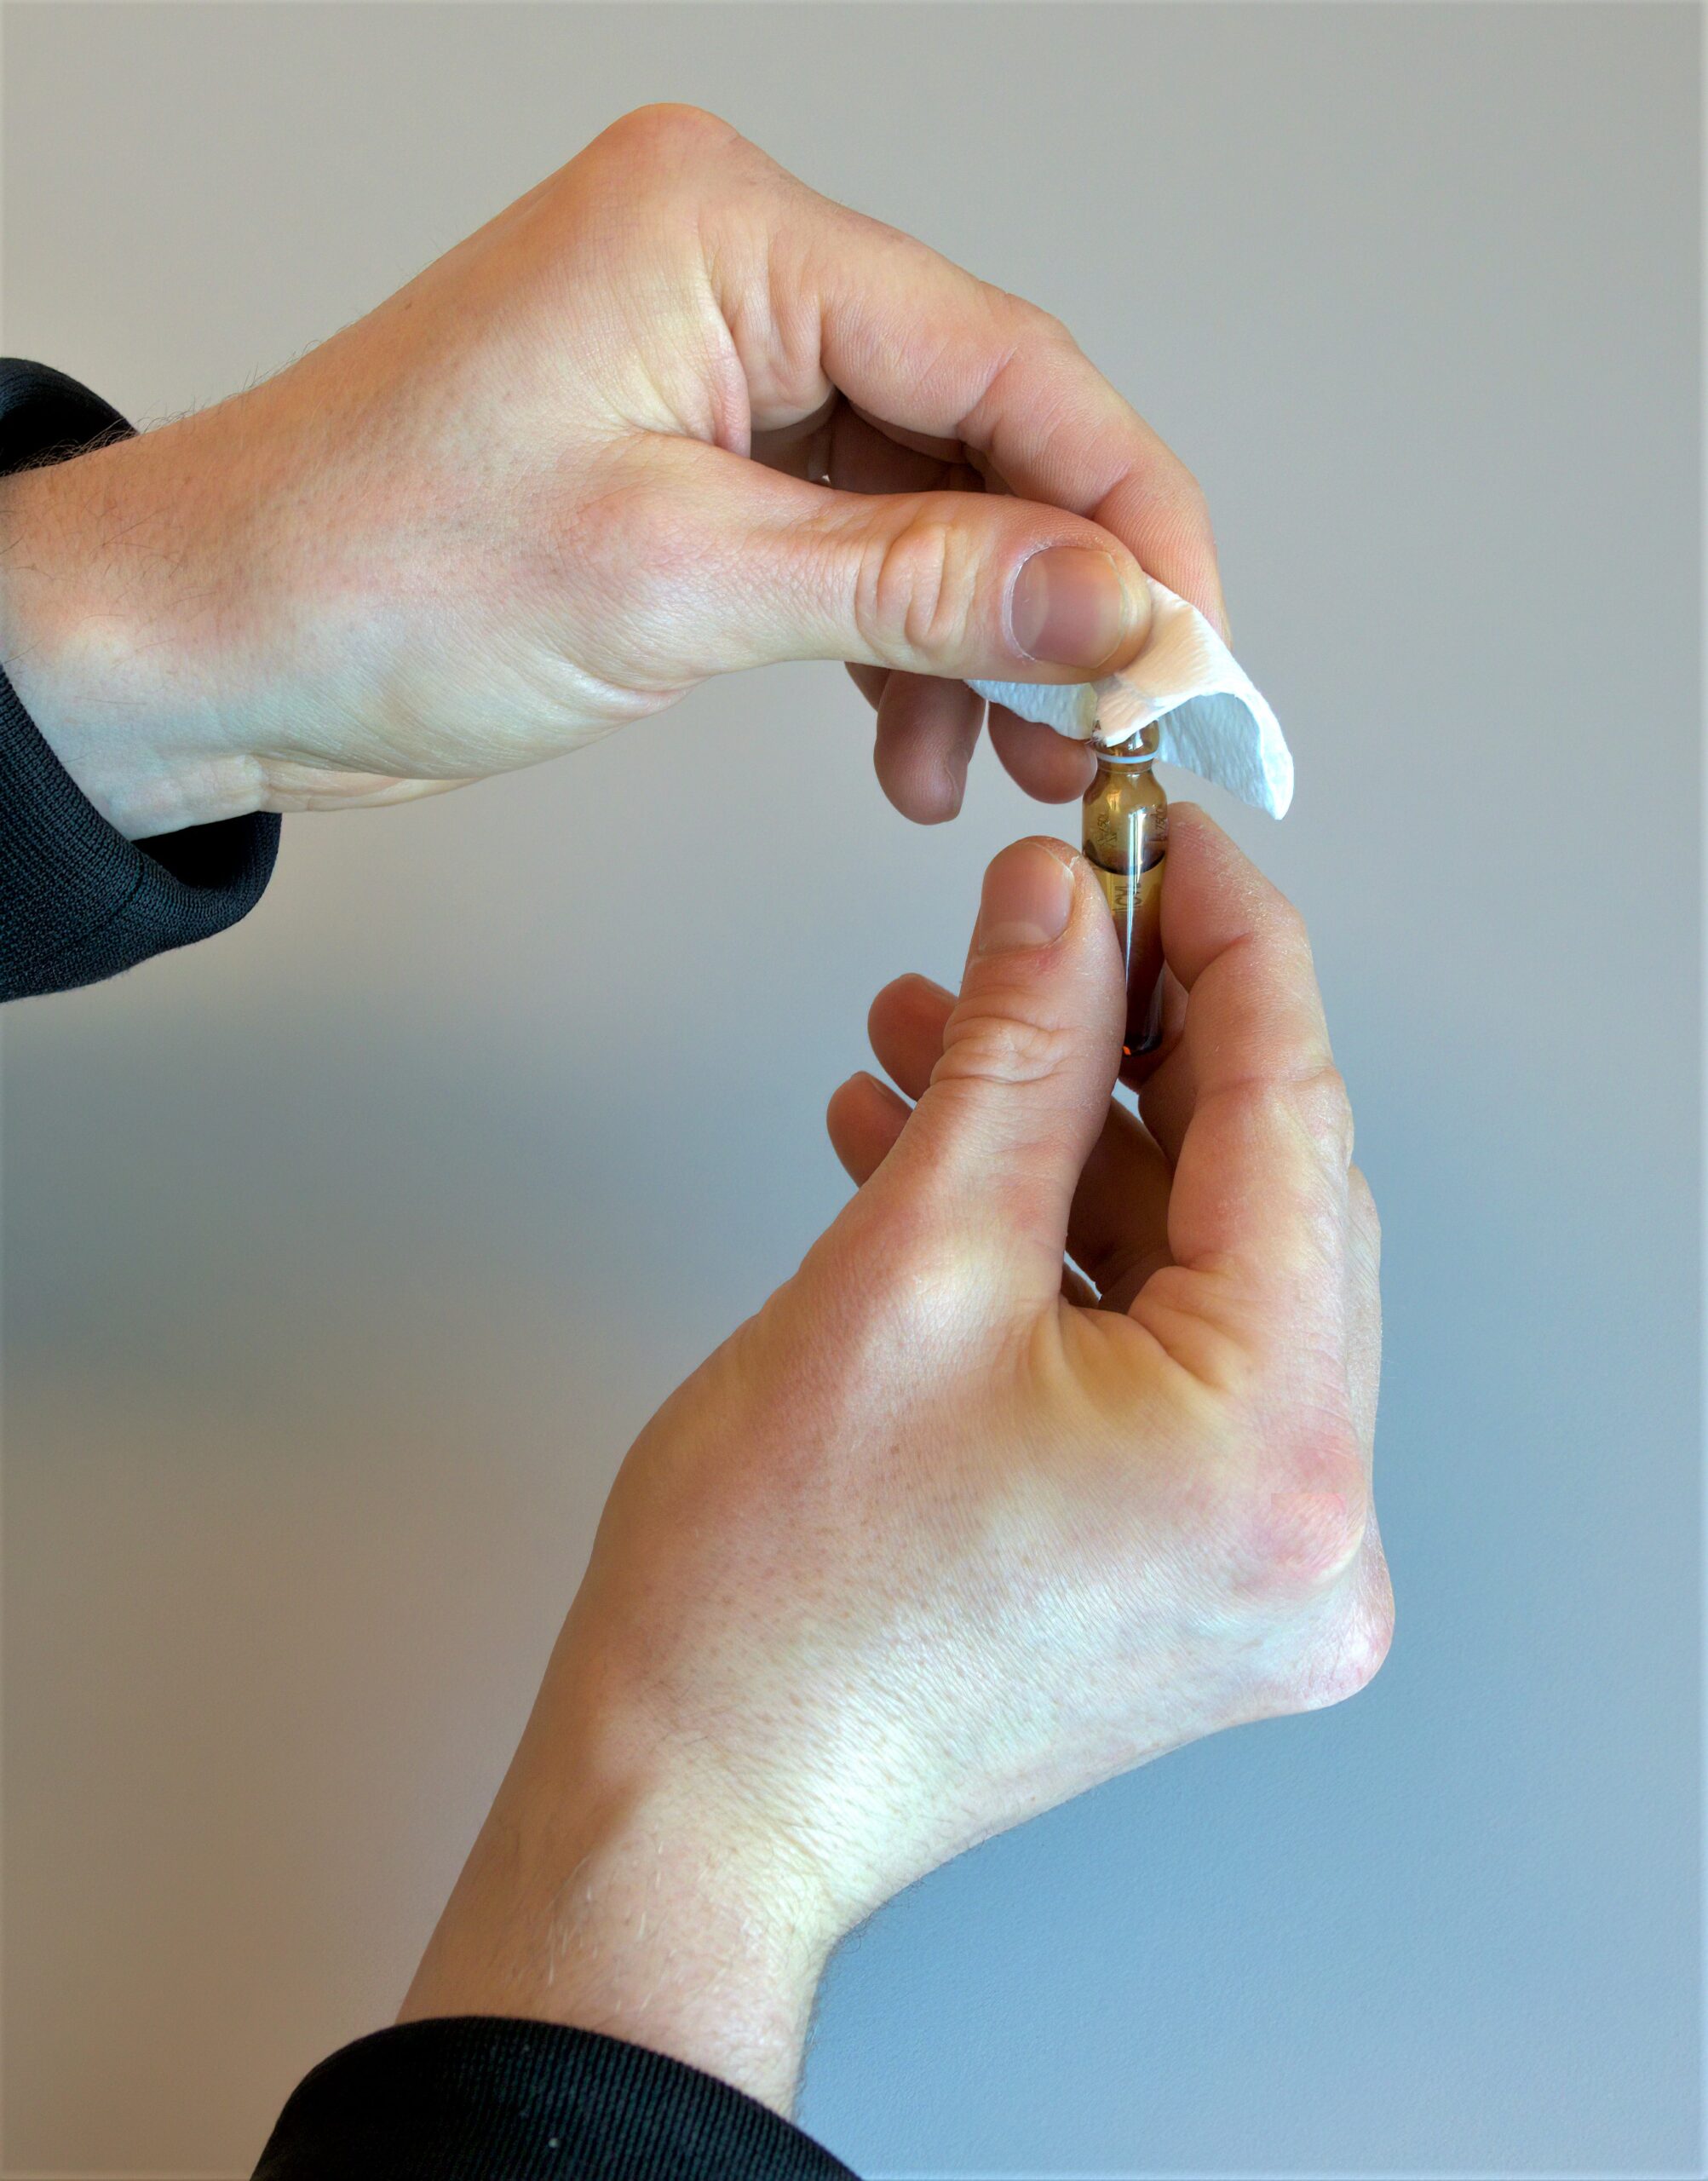
Picture: Break the ampoule open using a clean cloth.
4. Use a filter needle or the smallest possible drawing up needle. This will prevent any small fragments of glass from entering the syringe.
5. Insert the sterile needle into the ampoule and pull the plunger until the syringe contains the desired amount of substance. Do not inject more than 2 ml at a time.
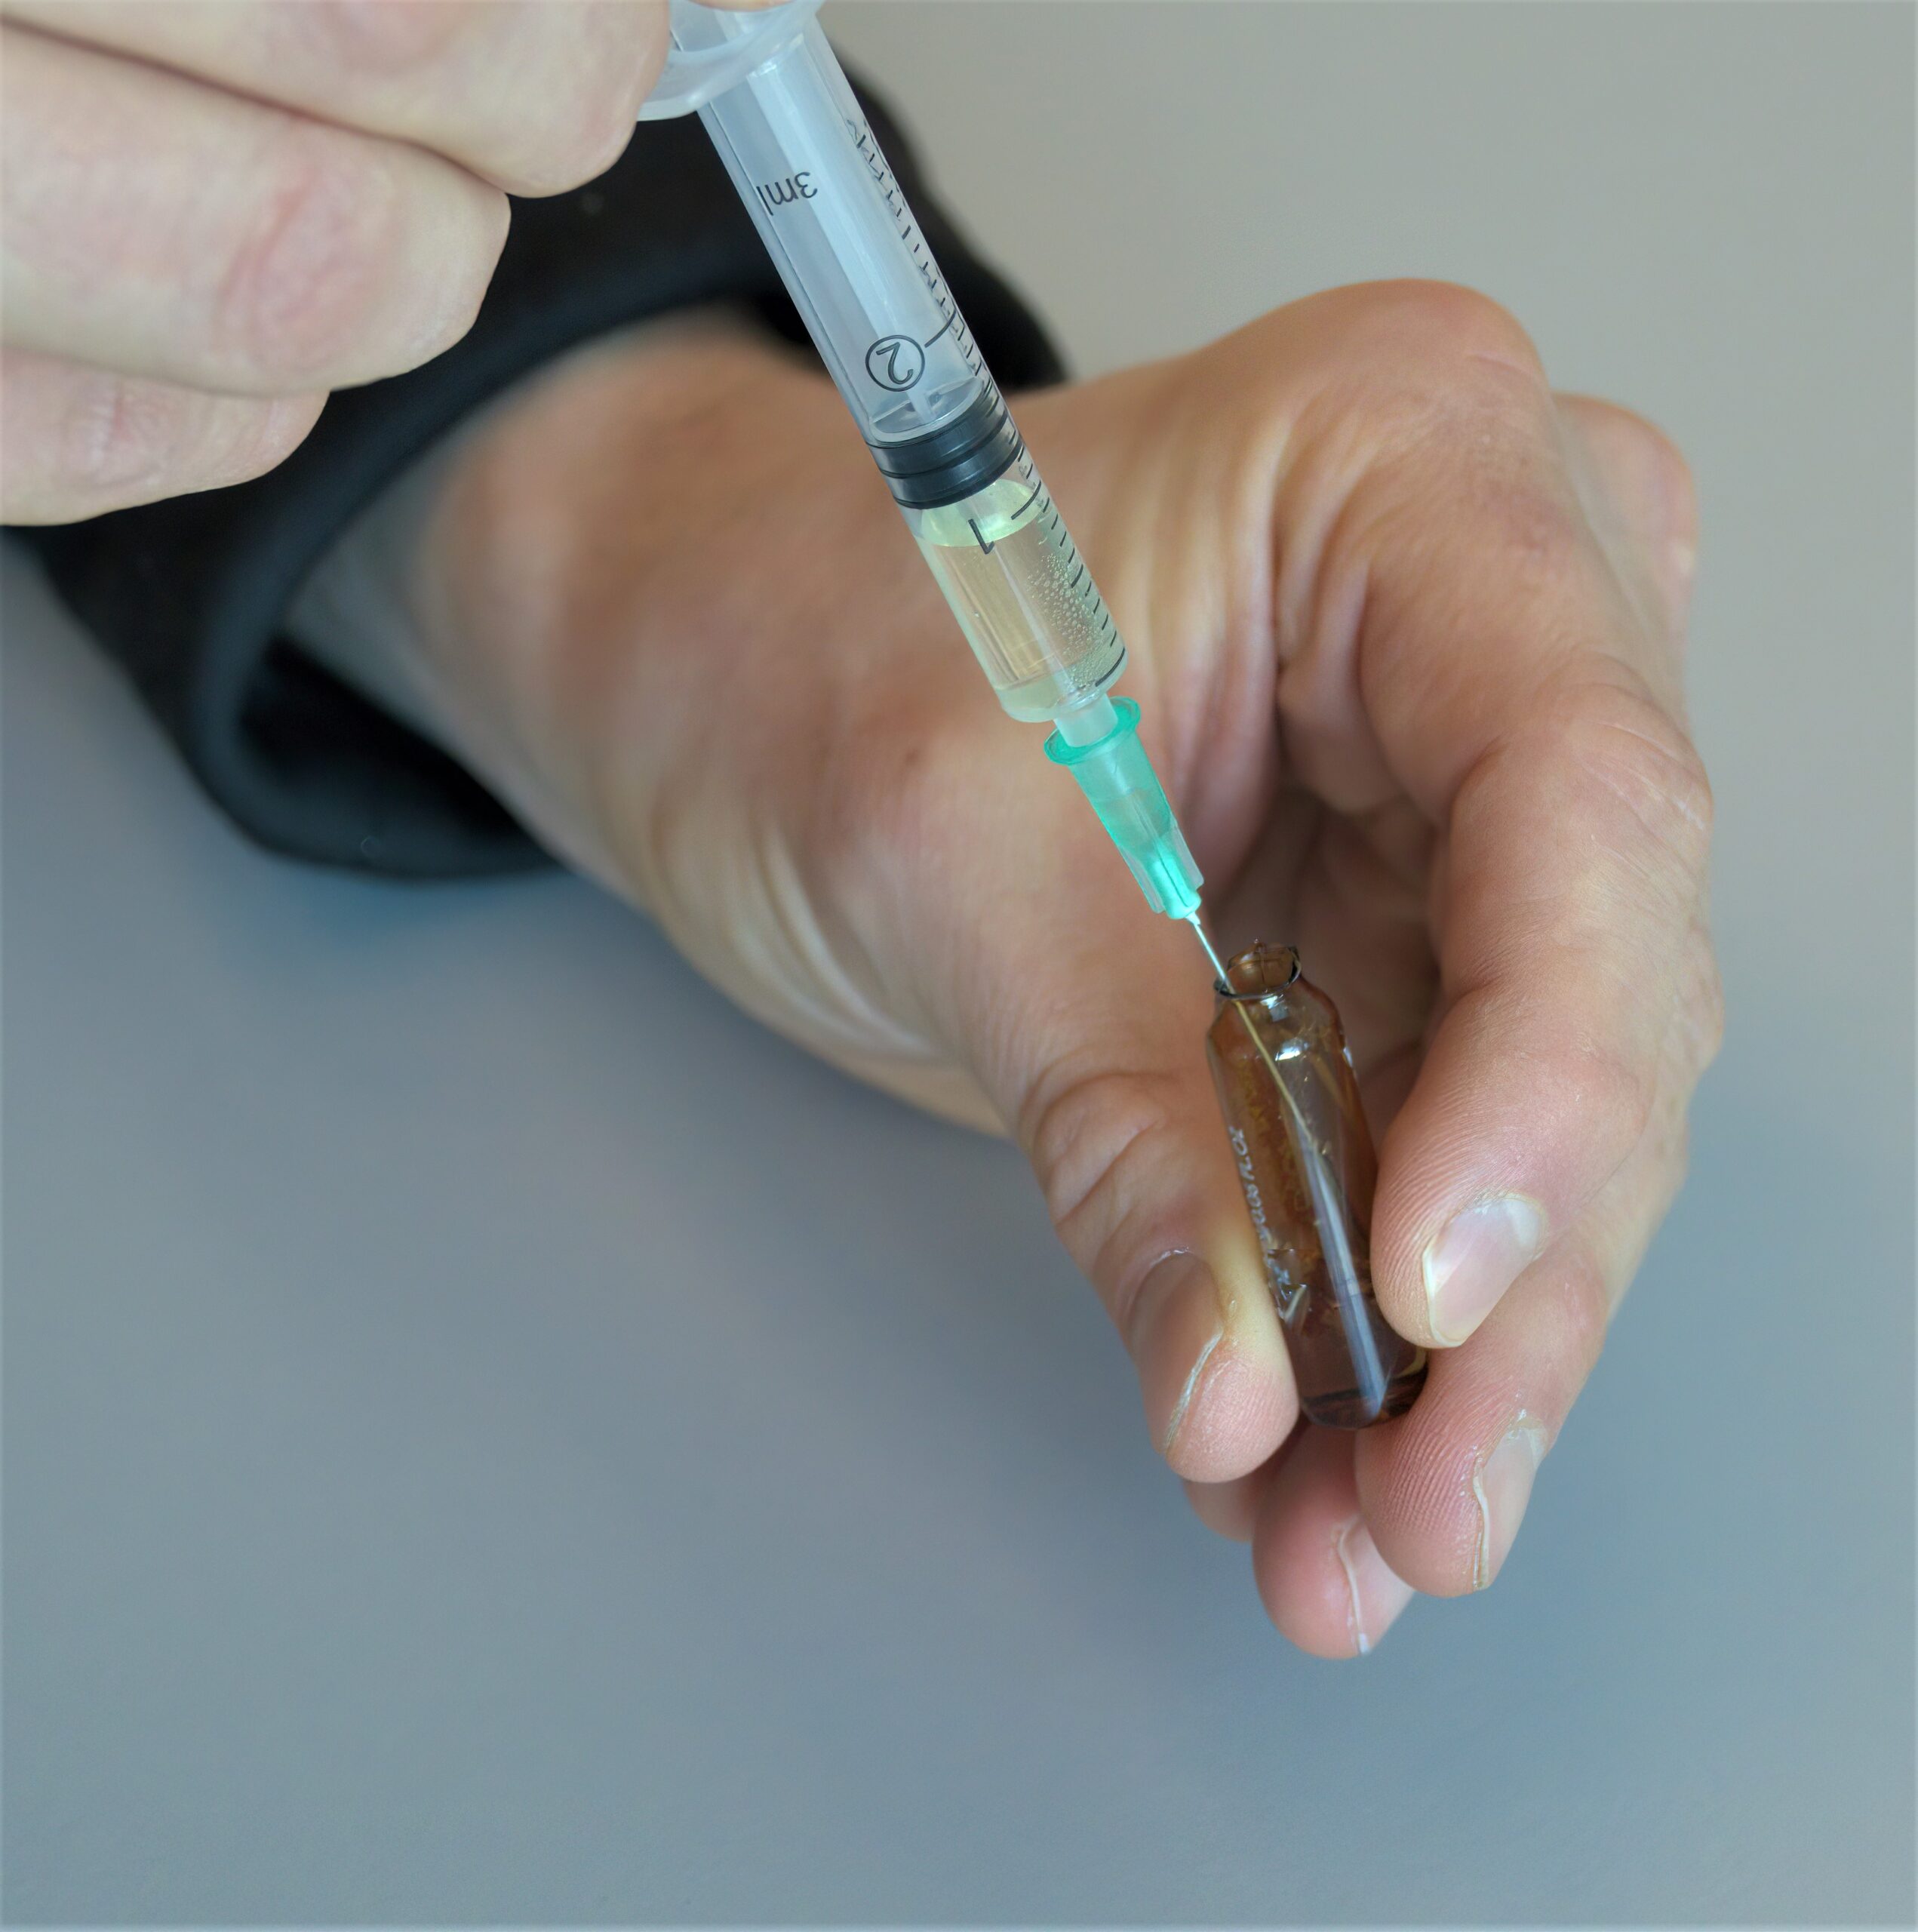
Picture: Drawing the substance from an ampoule.
6. Hold the syringe upright (needle up) and tap it with your finger so that any air bubbles rise to the top of the syringe. Gently push the plunger to get the air out of the syringe. Small air bubbles are not a problem.
7. Remove the needle and put it in the biohazard container.
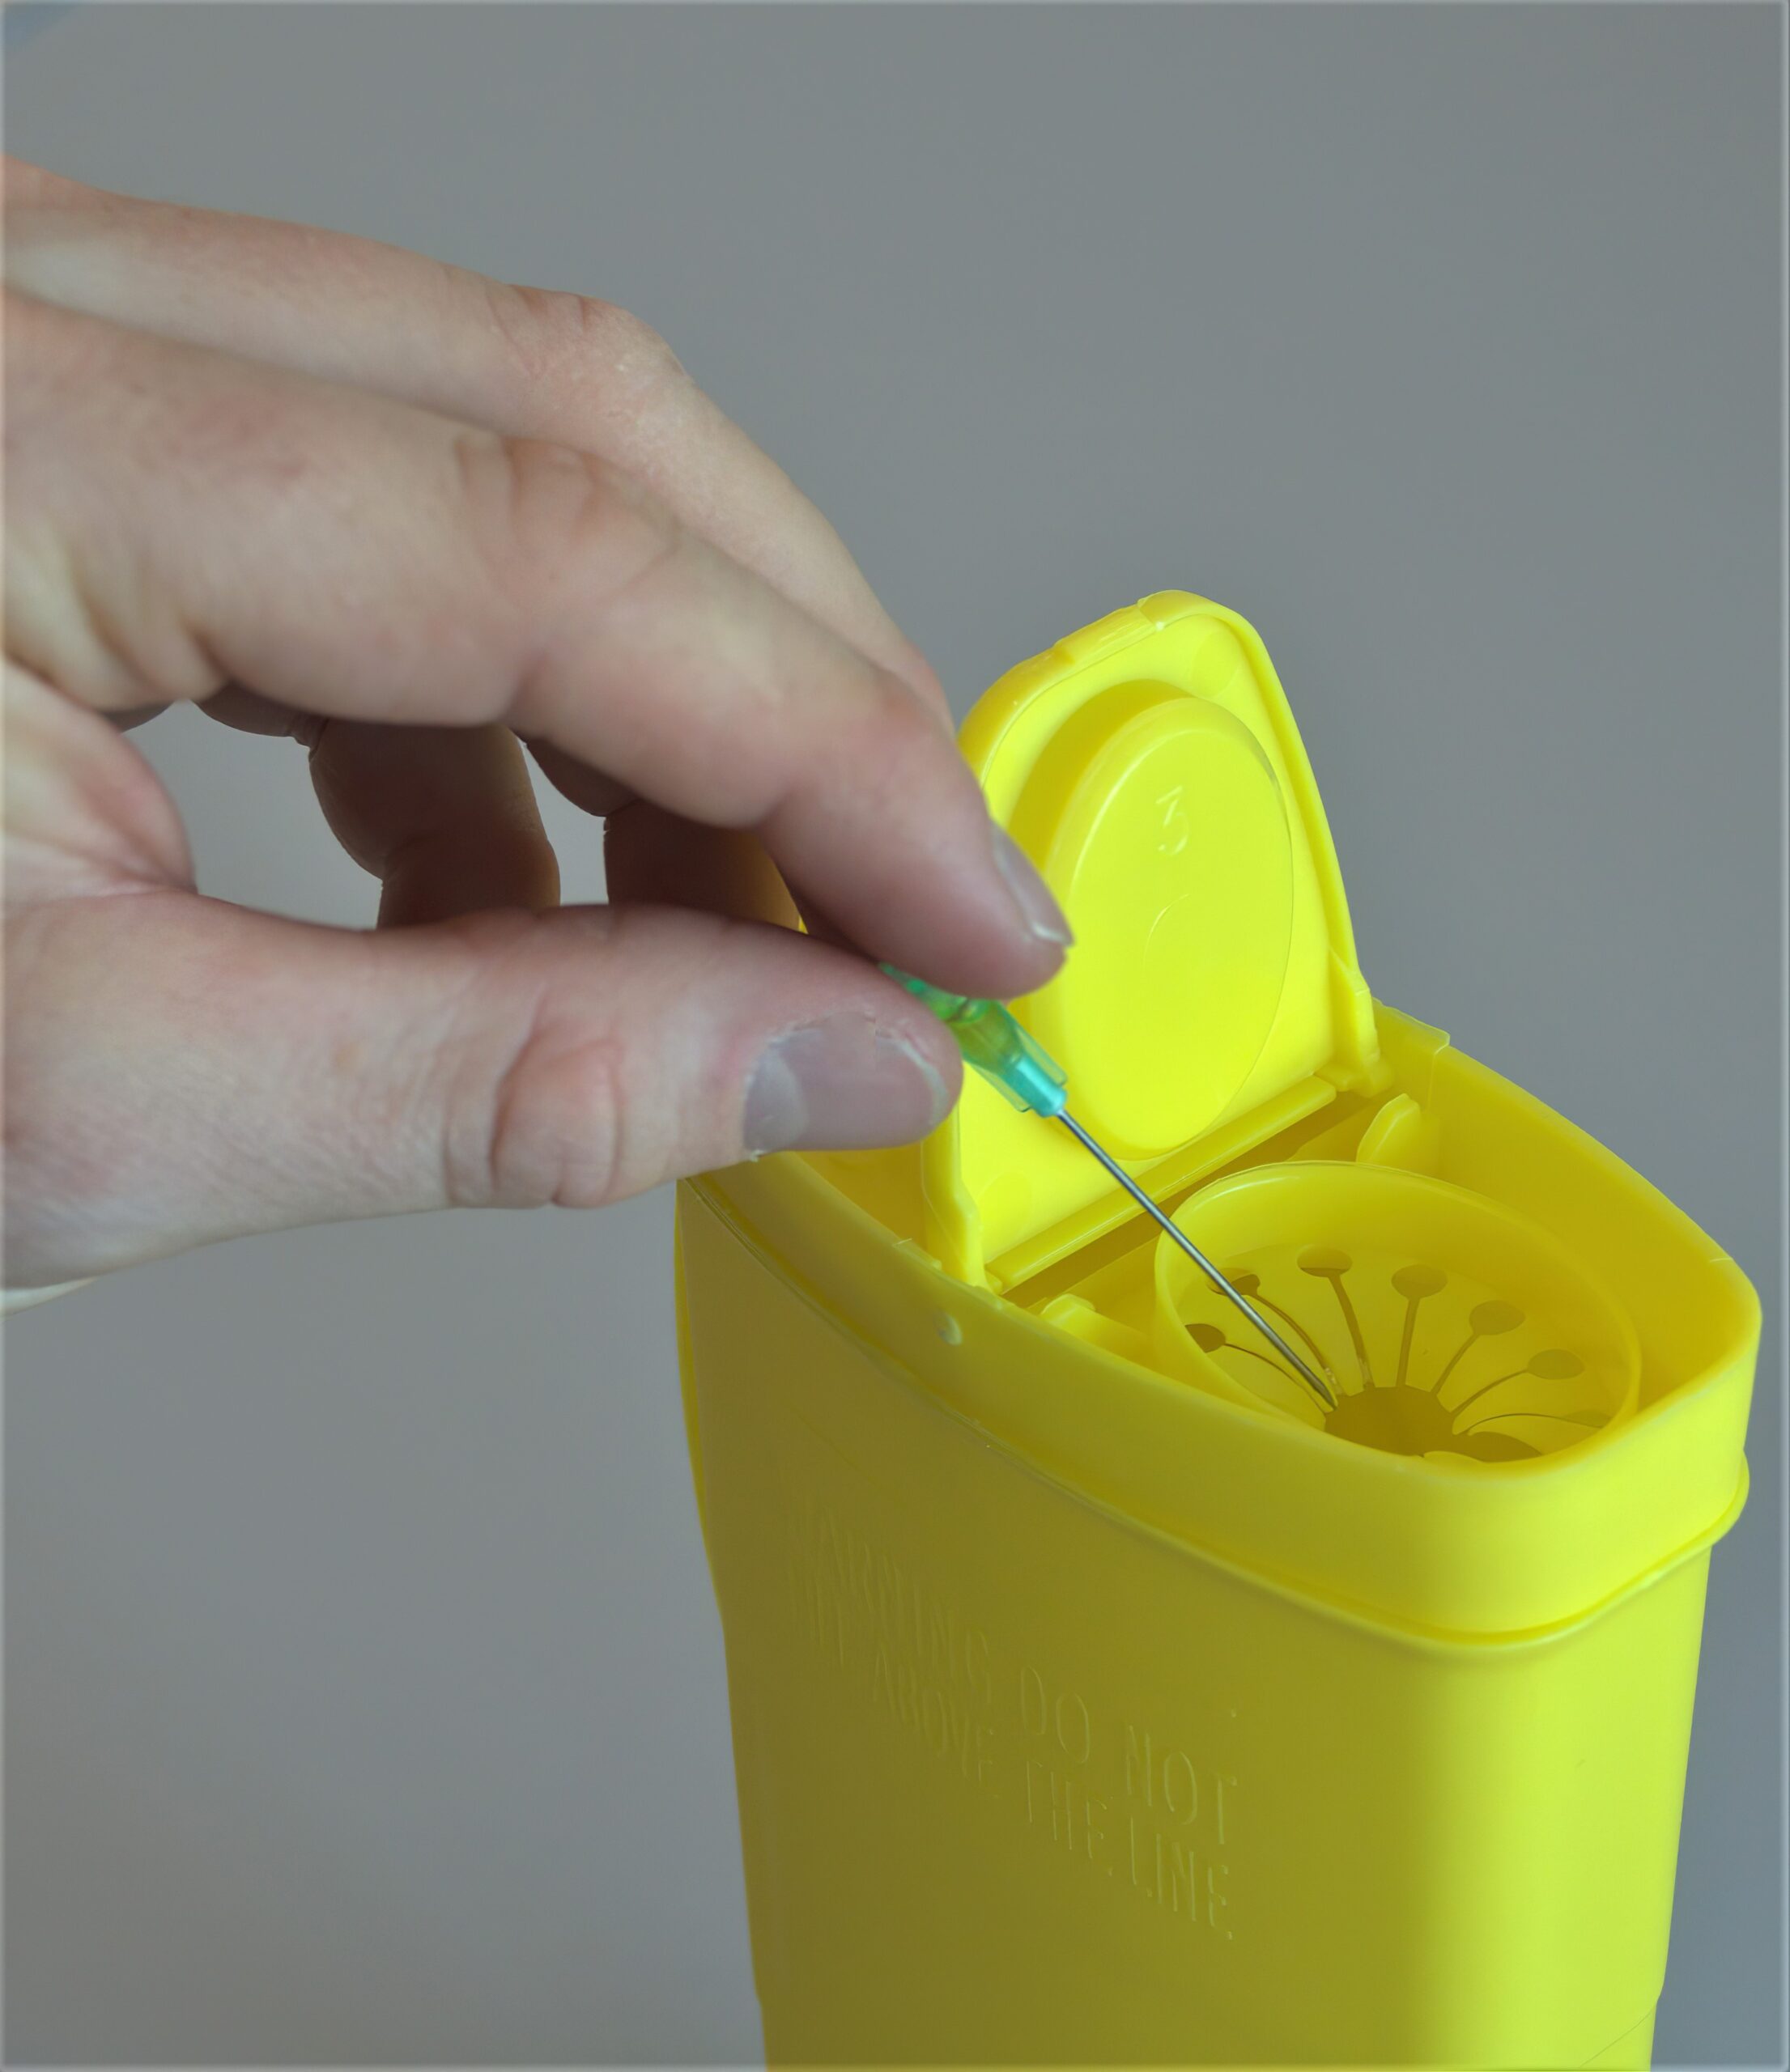
Picture: Putting the needle in a biohazard container.
8. Put a new, sterile injection needle that is a suitable size for injecting into the syringe.
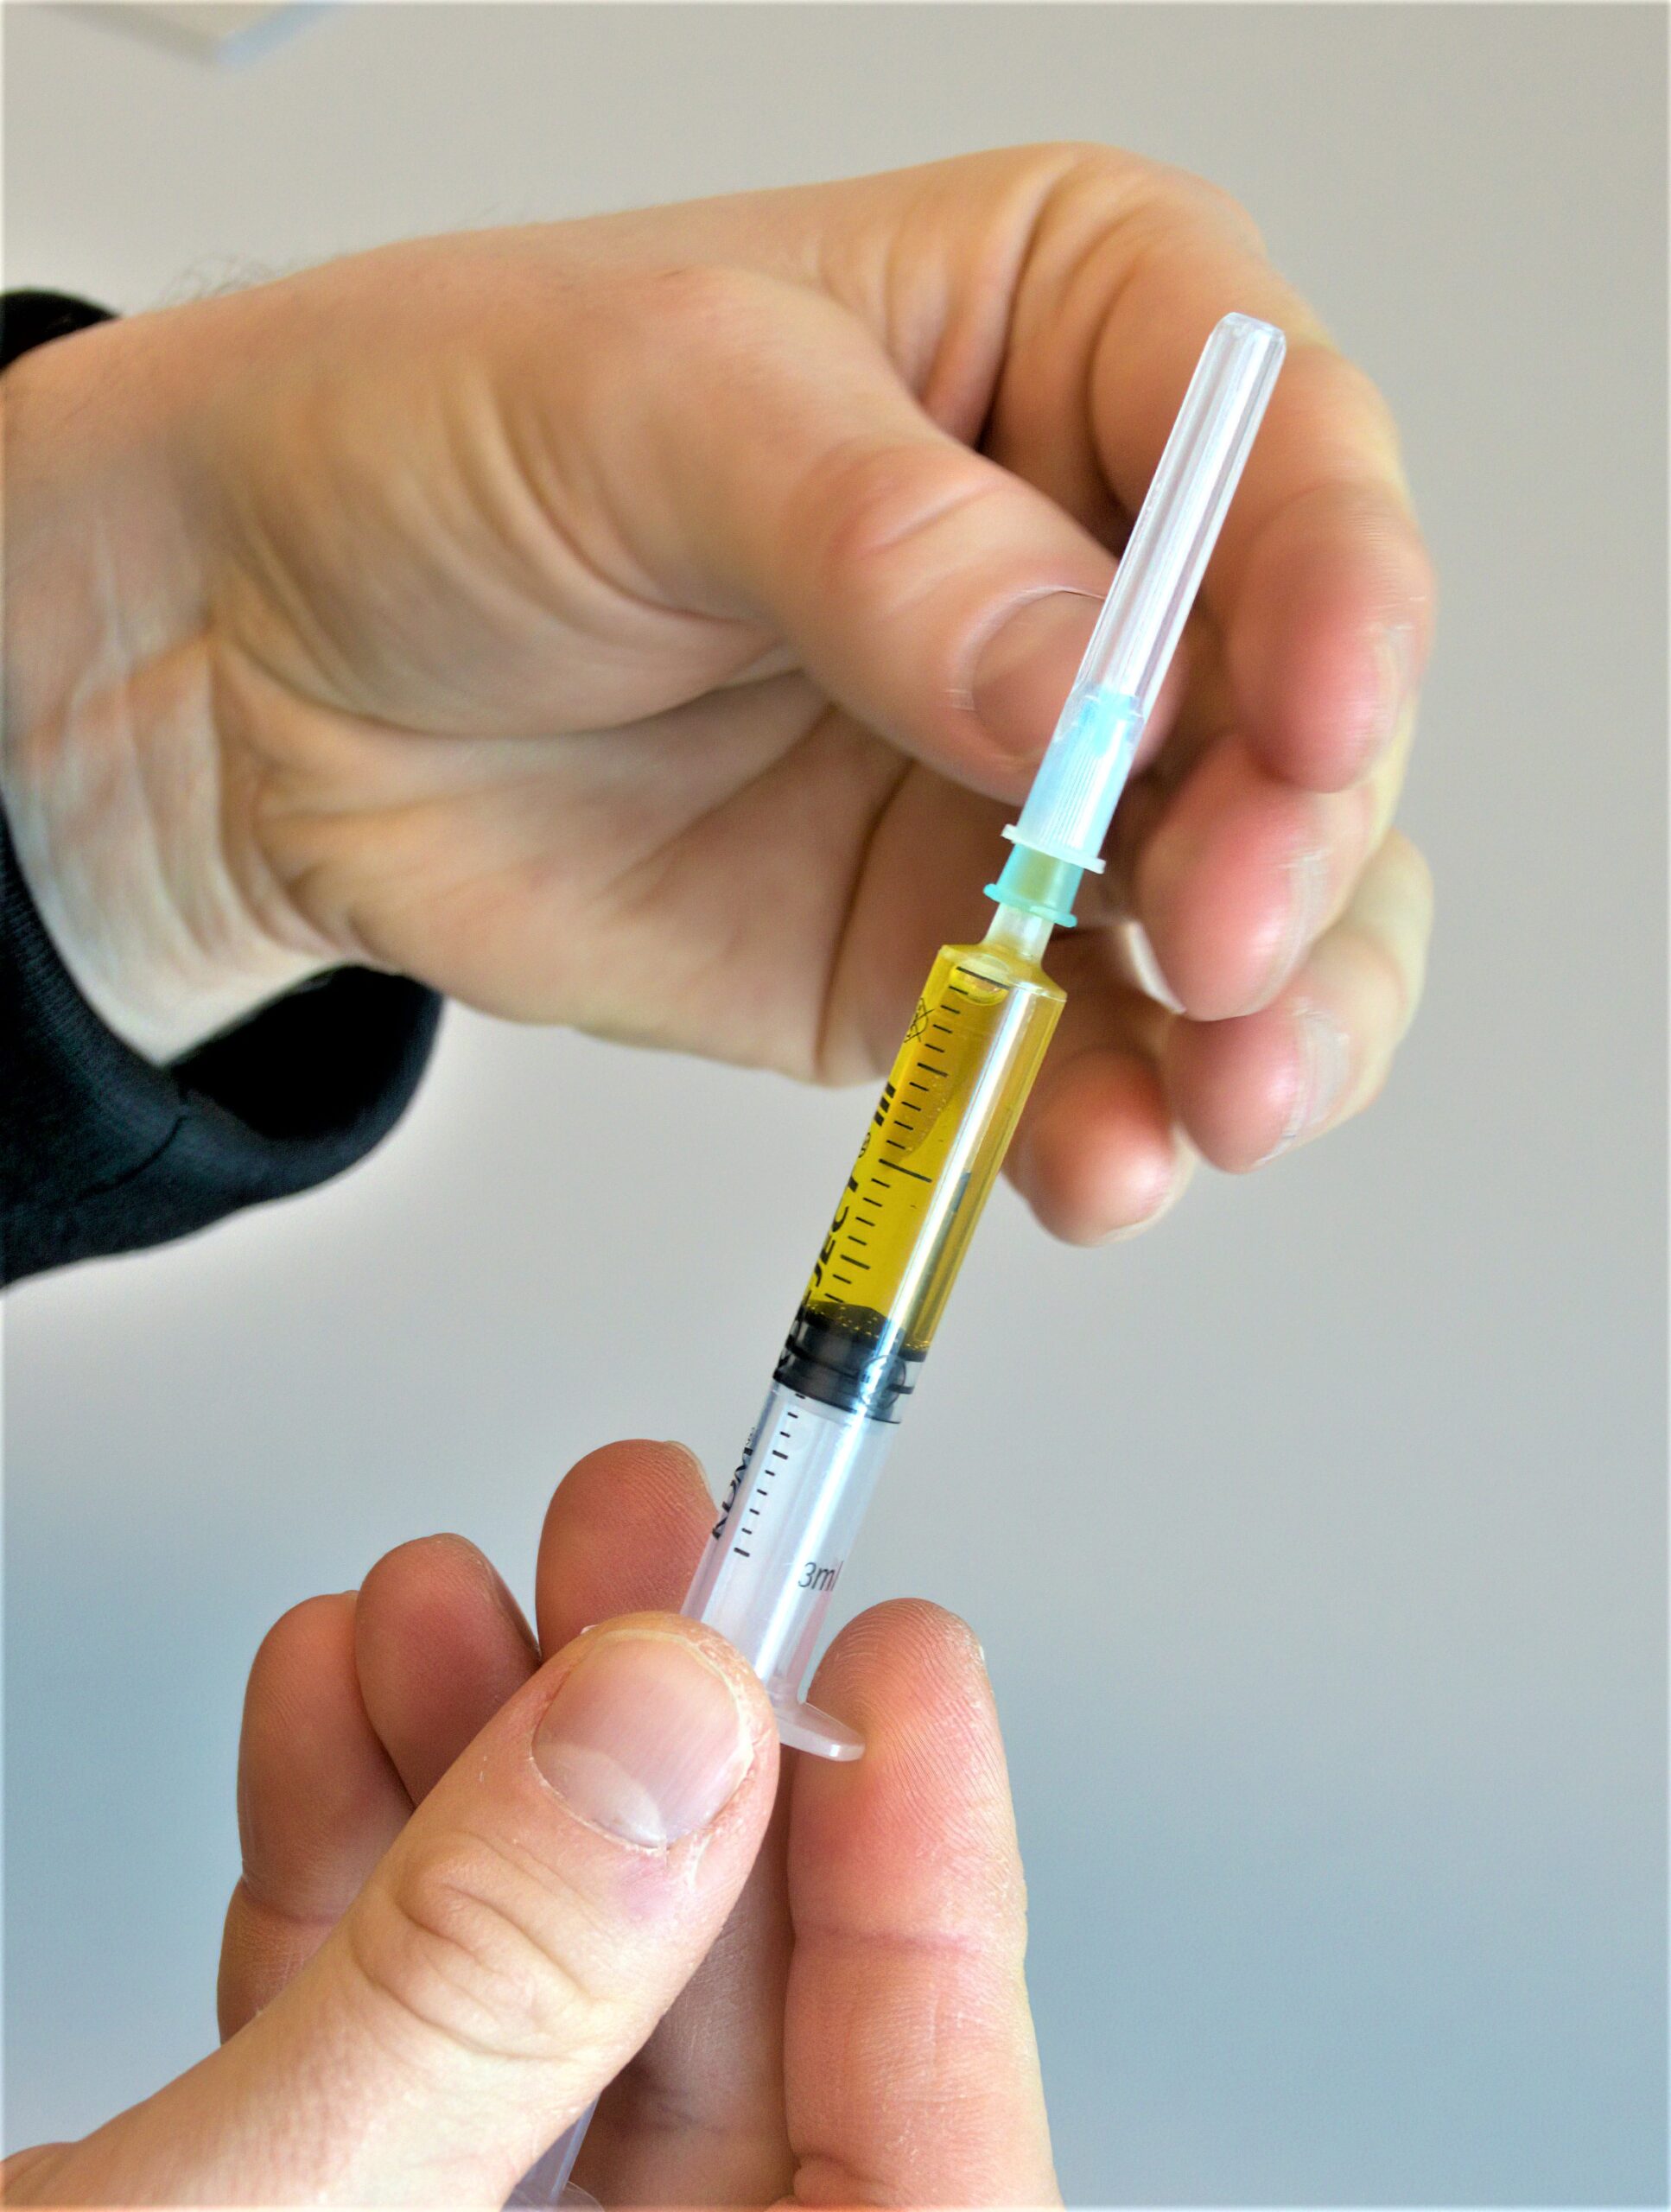
Picture: A needle ready for use.
Please note: Keep the needle cover in place until you are ready to inject.
If the product has been kept in the fridge, take it out into room temperature, or warm an oil-based anabolic steroid in warm water before injecting it to make it more fluid. Check that the dry powder of the water-based anabolic steroid is mixed well with the liquid. There must be no lumps. Please note: Do not mix tap water with the dry material. Use only water that is intended for injections. Prepare the injection site and equipment carefully before injecting. For example, place the equipment on a clean cloth on top of a clean, well-lit table.
Drawing the substance from a vial
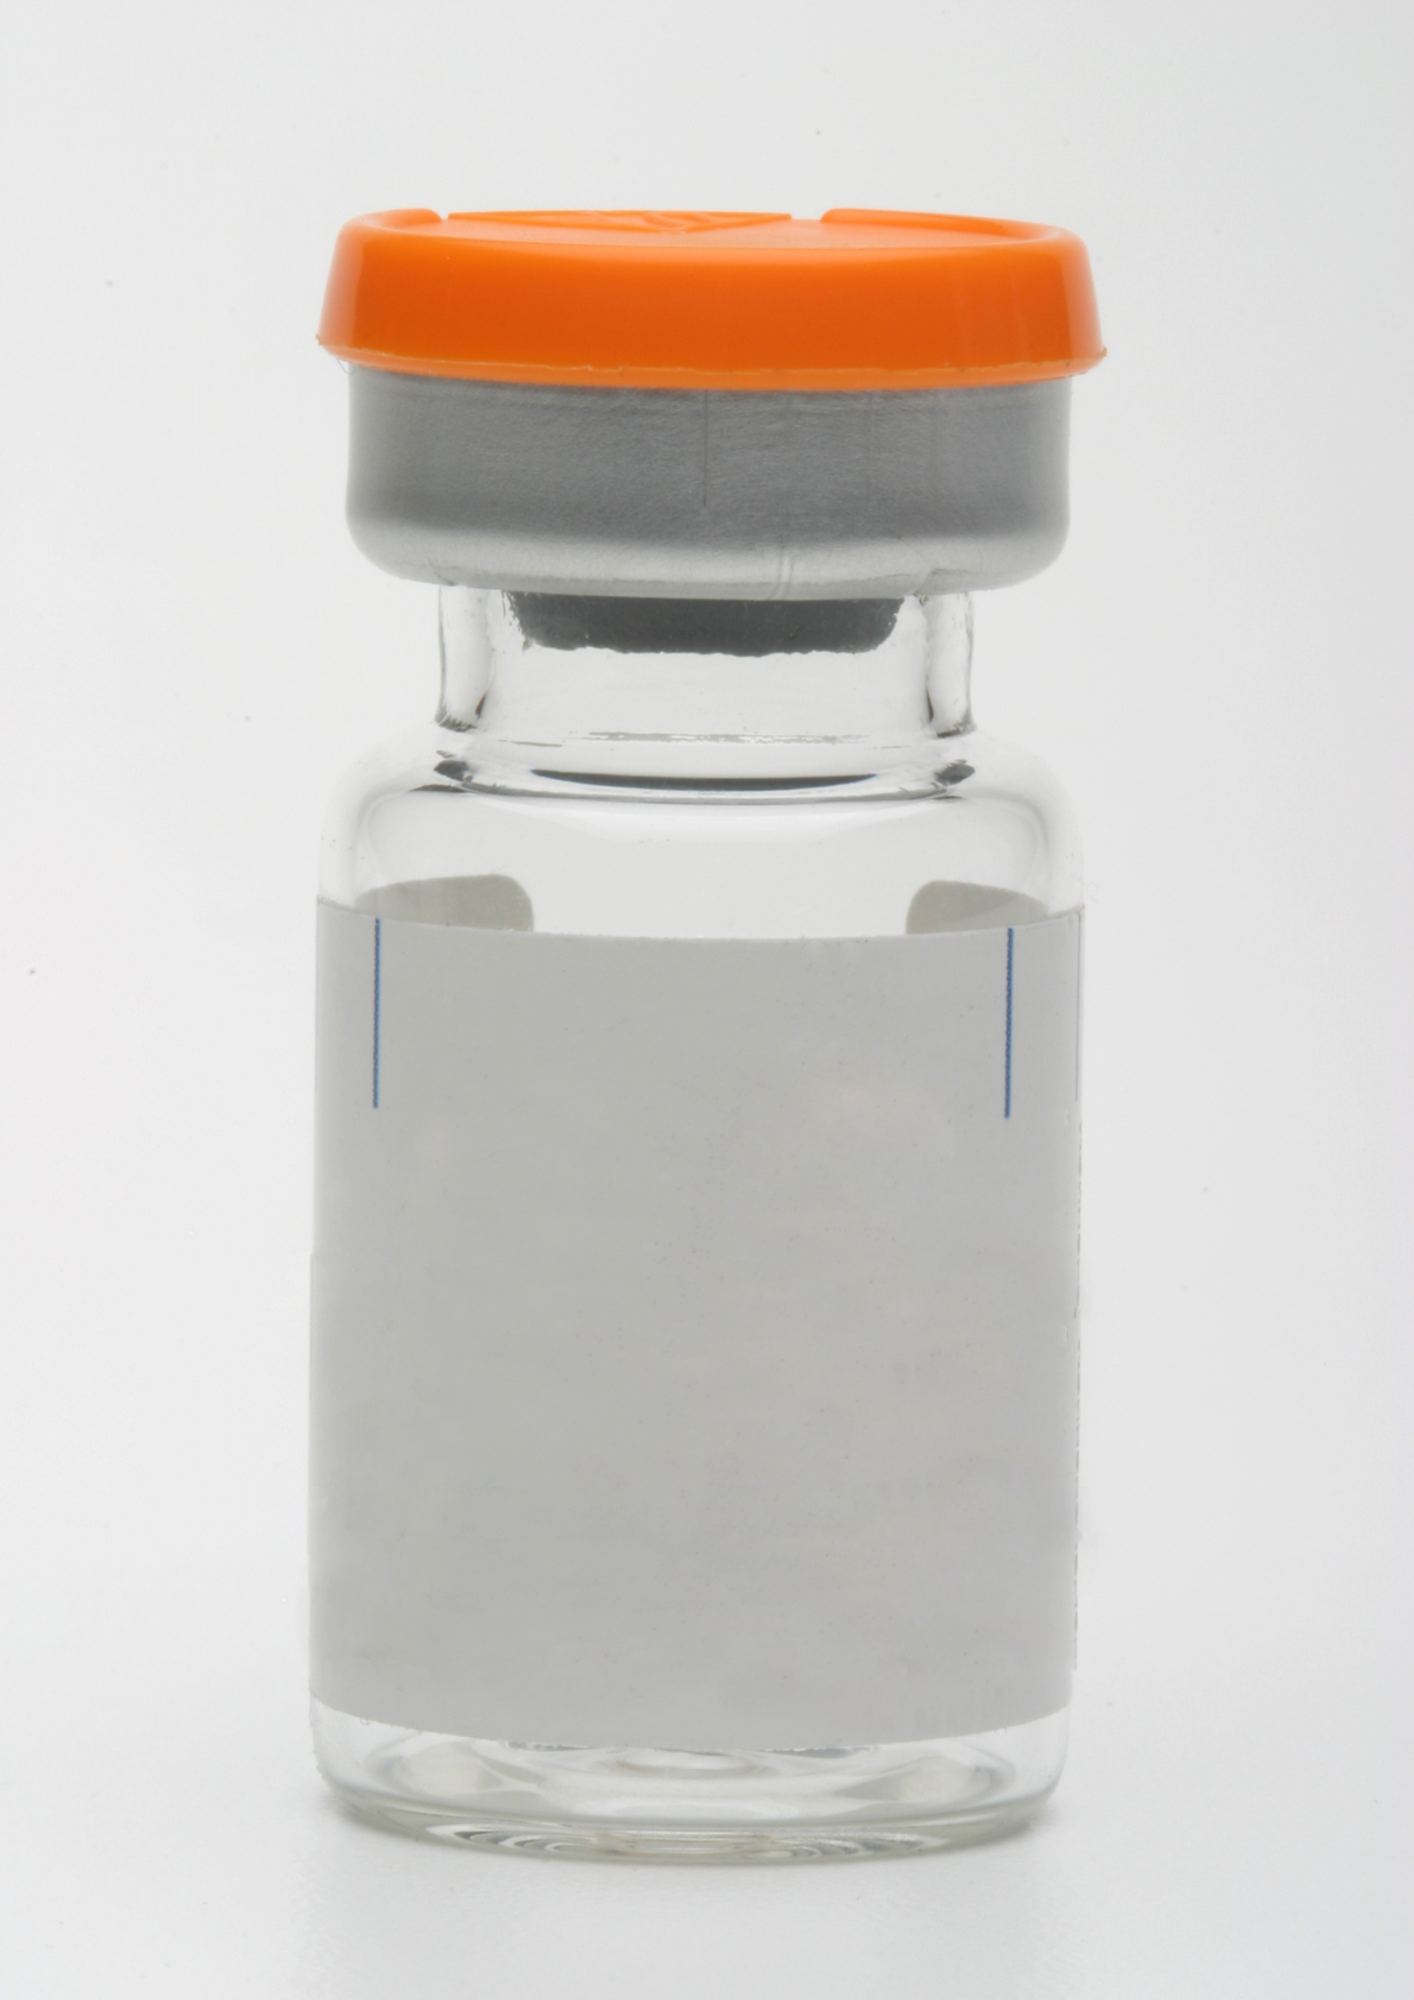
Picture: Vial.
Stages
1. Gently turn the bottle upside down and the right way up again.
2. Open the lid of the vial.
3. Clean the rubber top with an alcohol swab. Allow the top to dry.
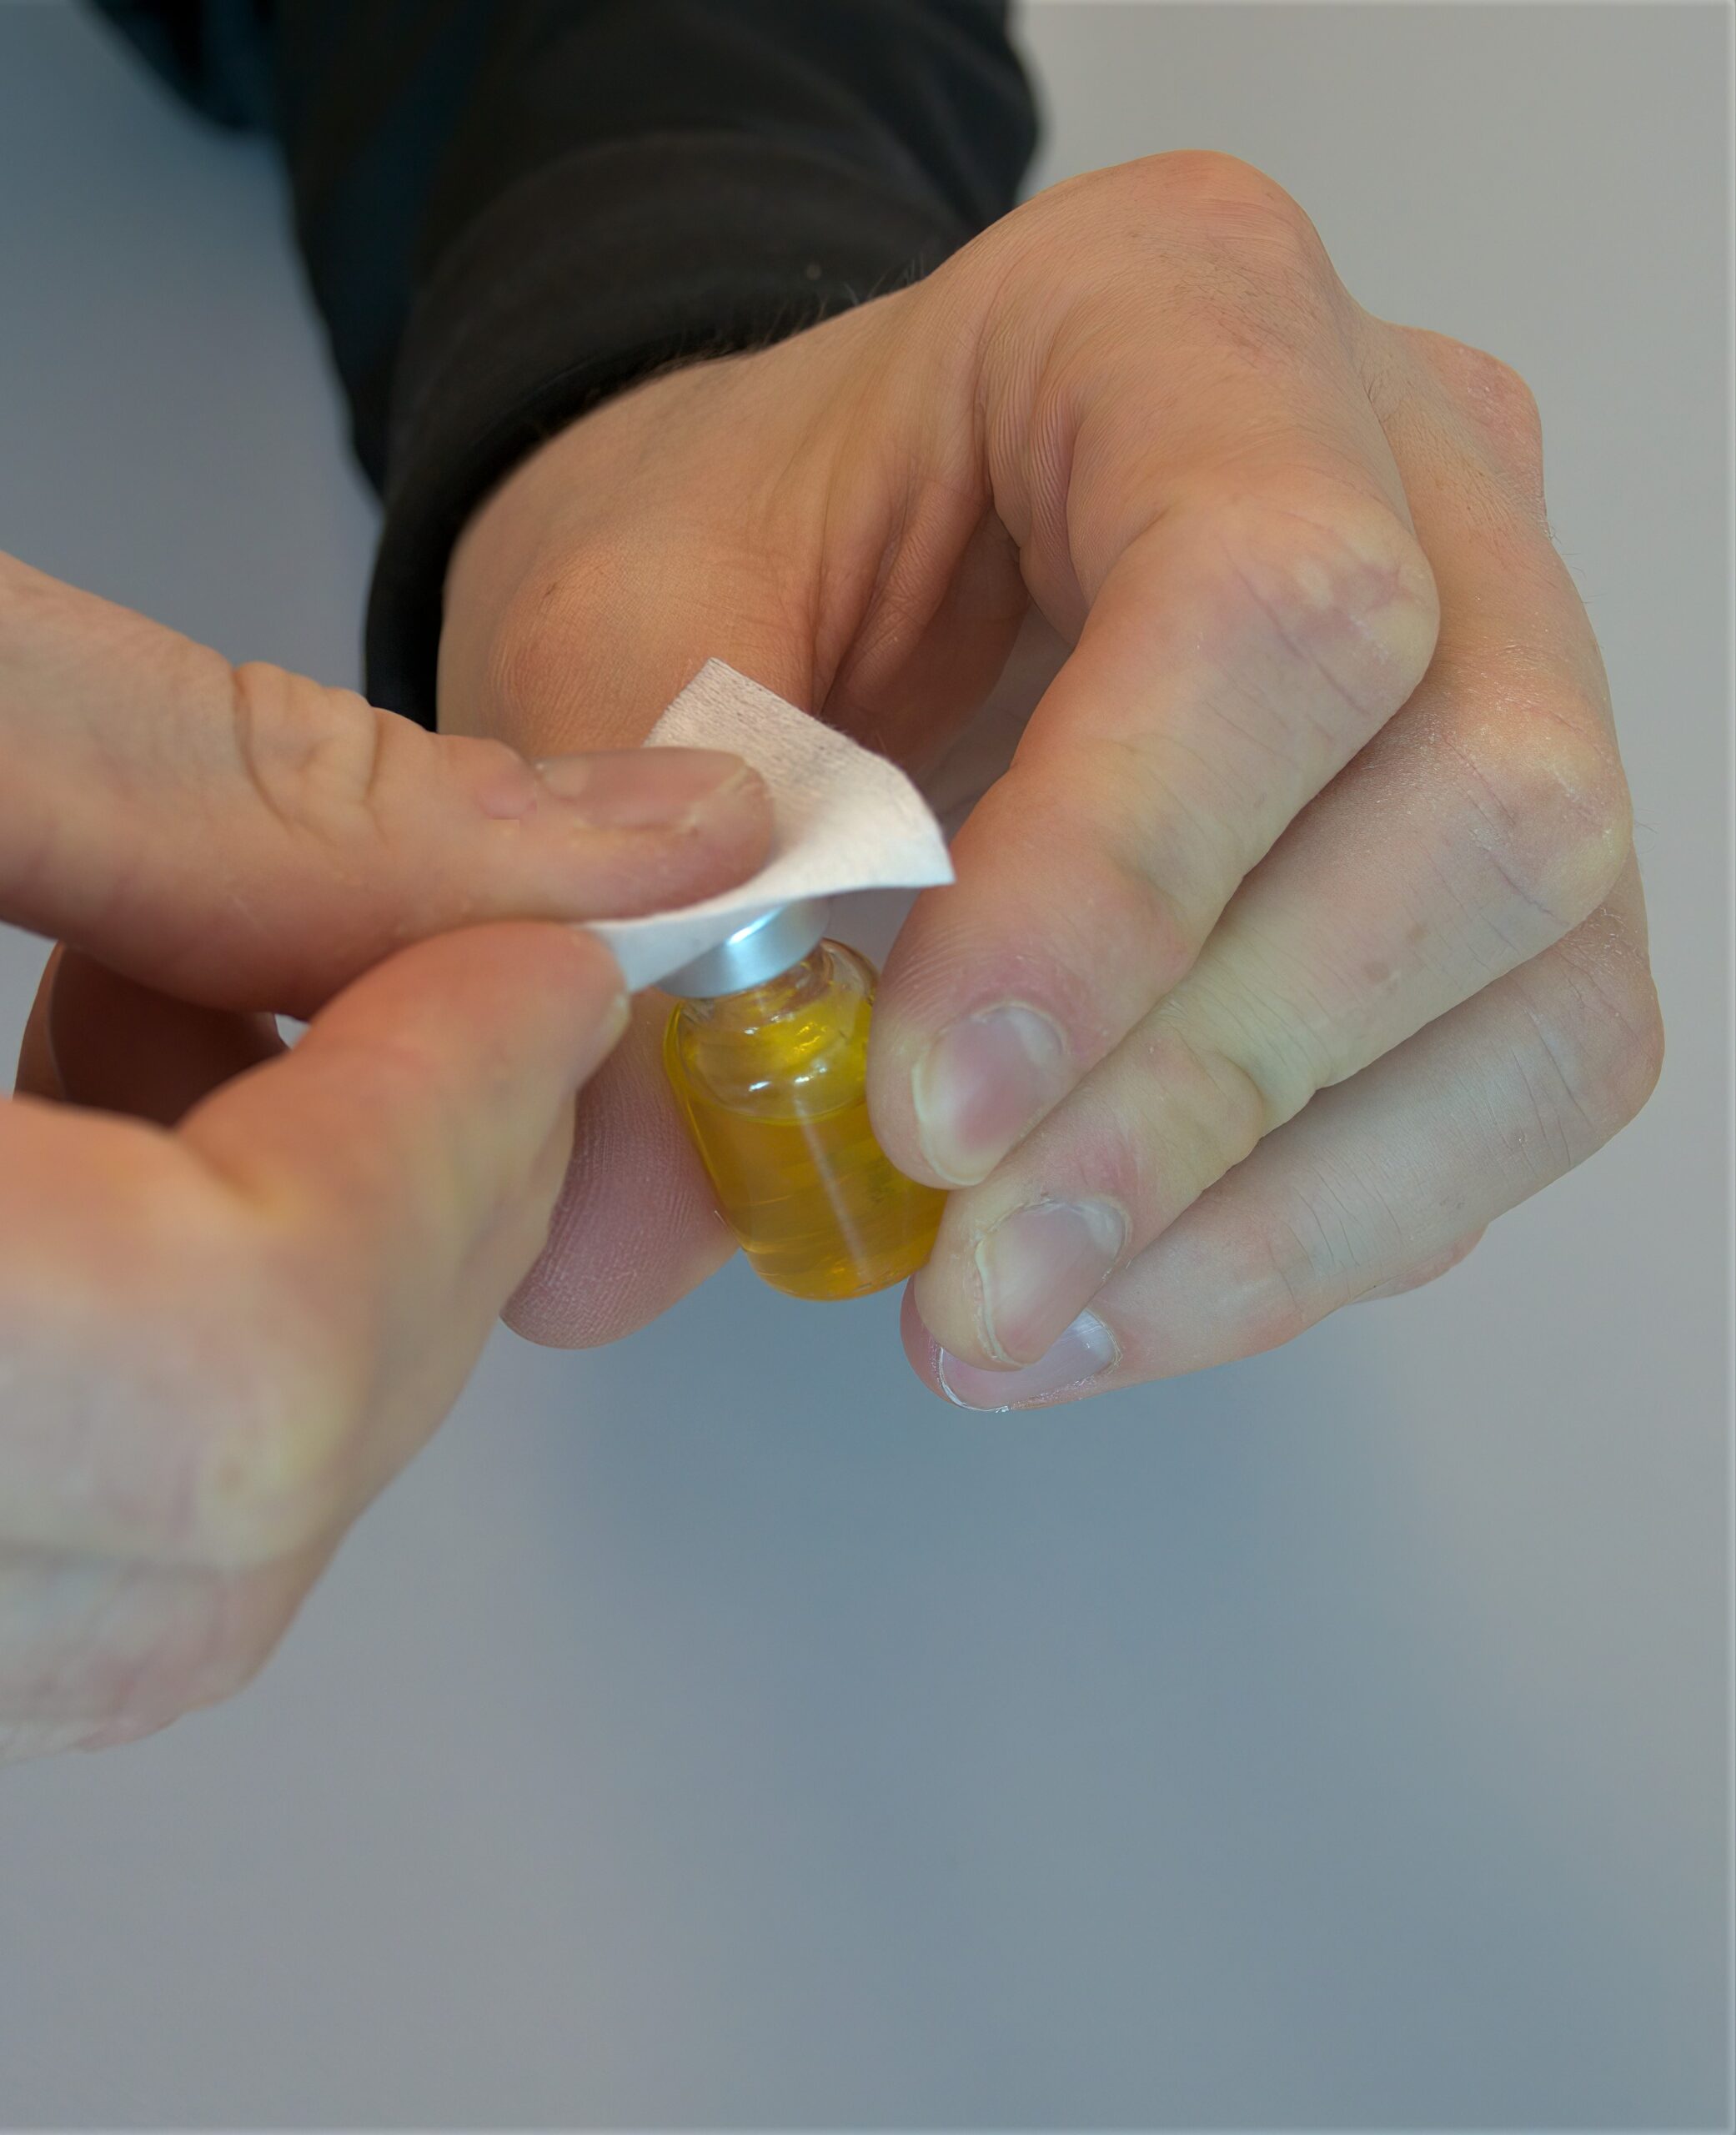
Picture: Disinfecting the rubber top of a vial with an alcohol swab.
4. Insert a sterile drawing up needle or filter needle through the rubber and squeeze a small amount of air into the bottle. This will make it easier to draw the substance into the syringe.
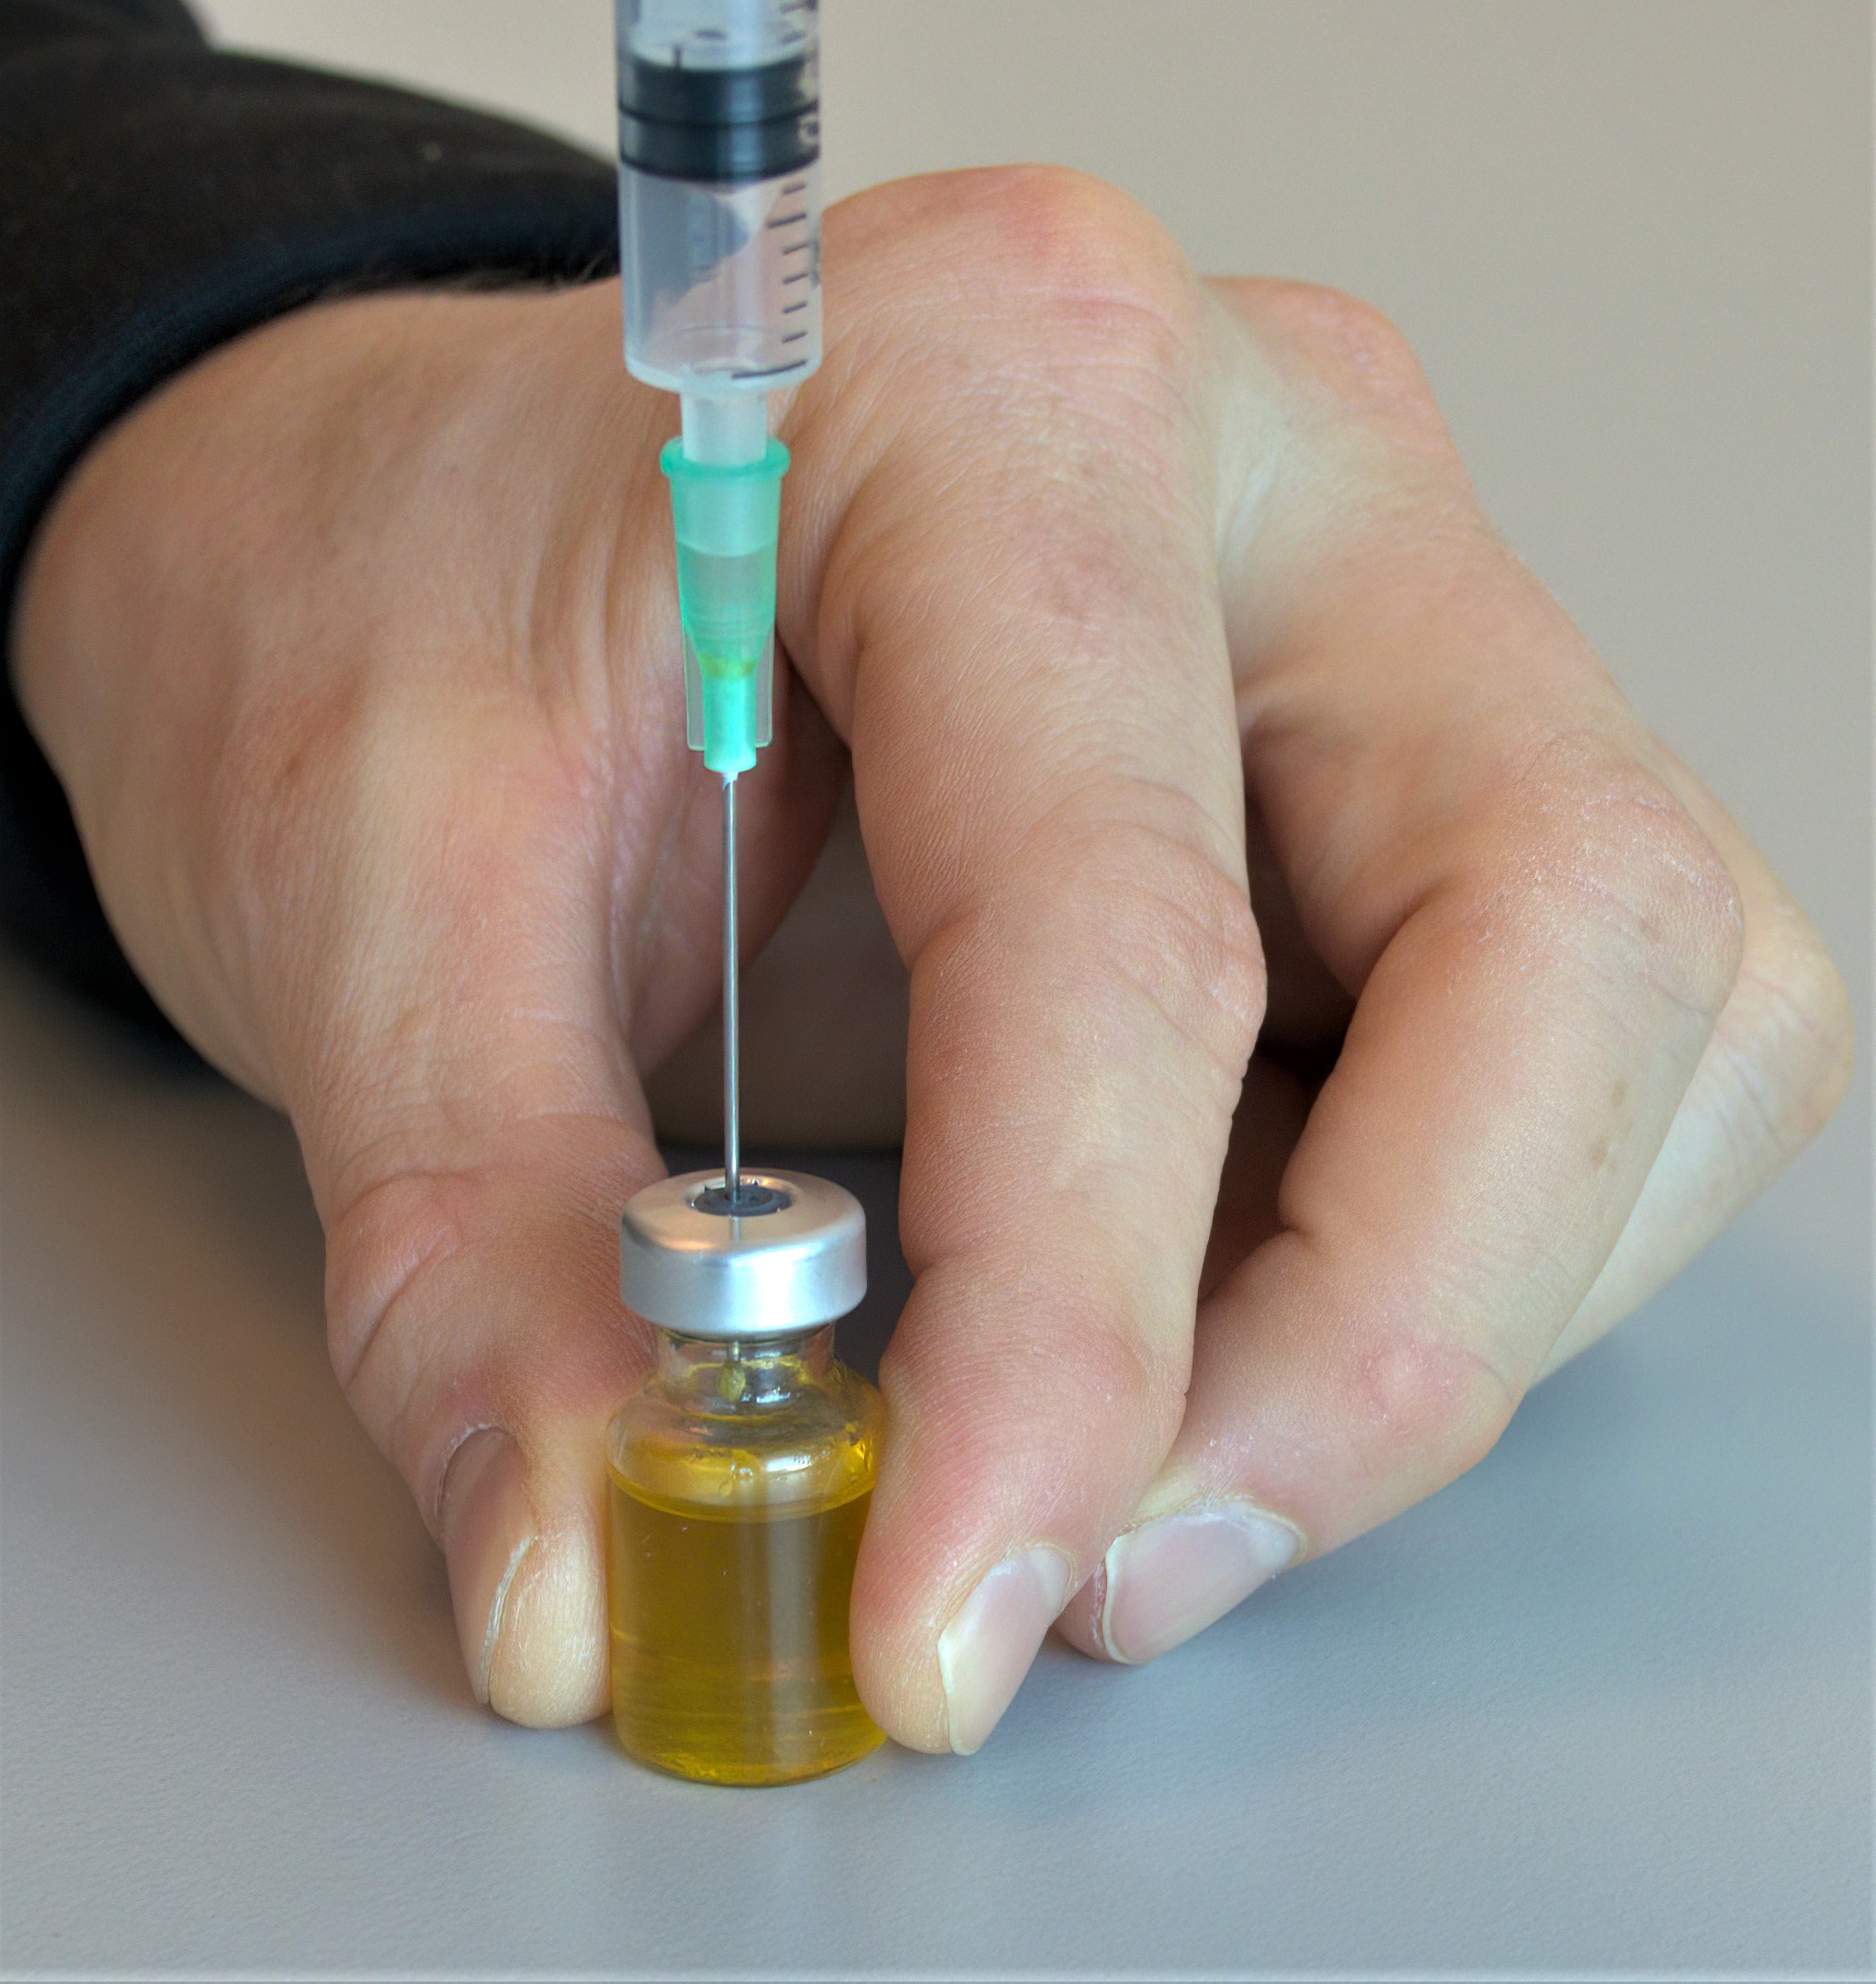
Picture: Squeezing air into the vial.
5. Draw the plunger until you have the desired amount of substance in the syringe. Do not inject more than 2 ml at a time.
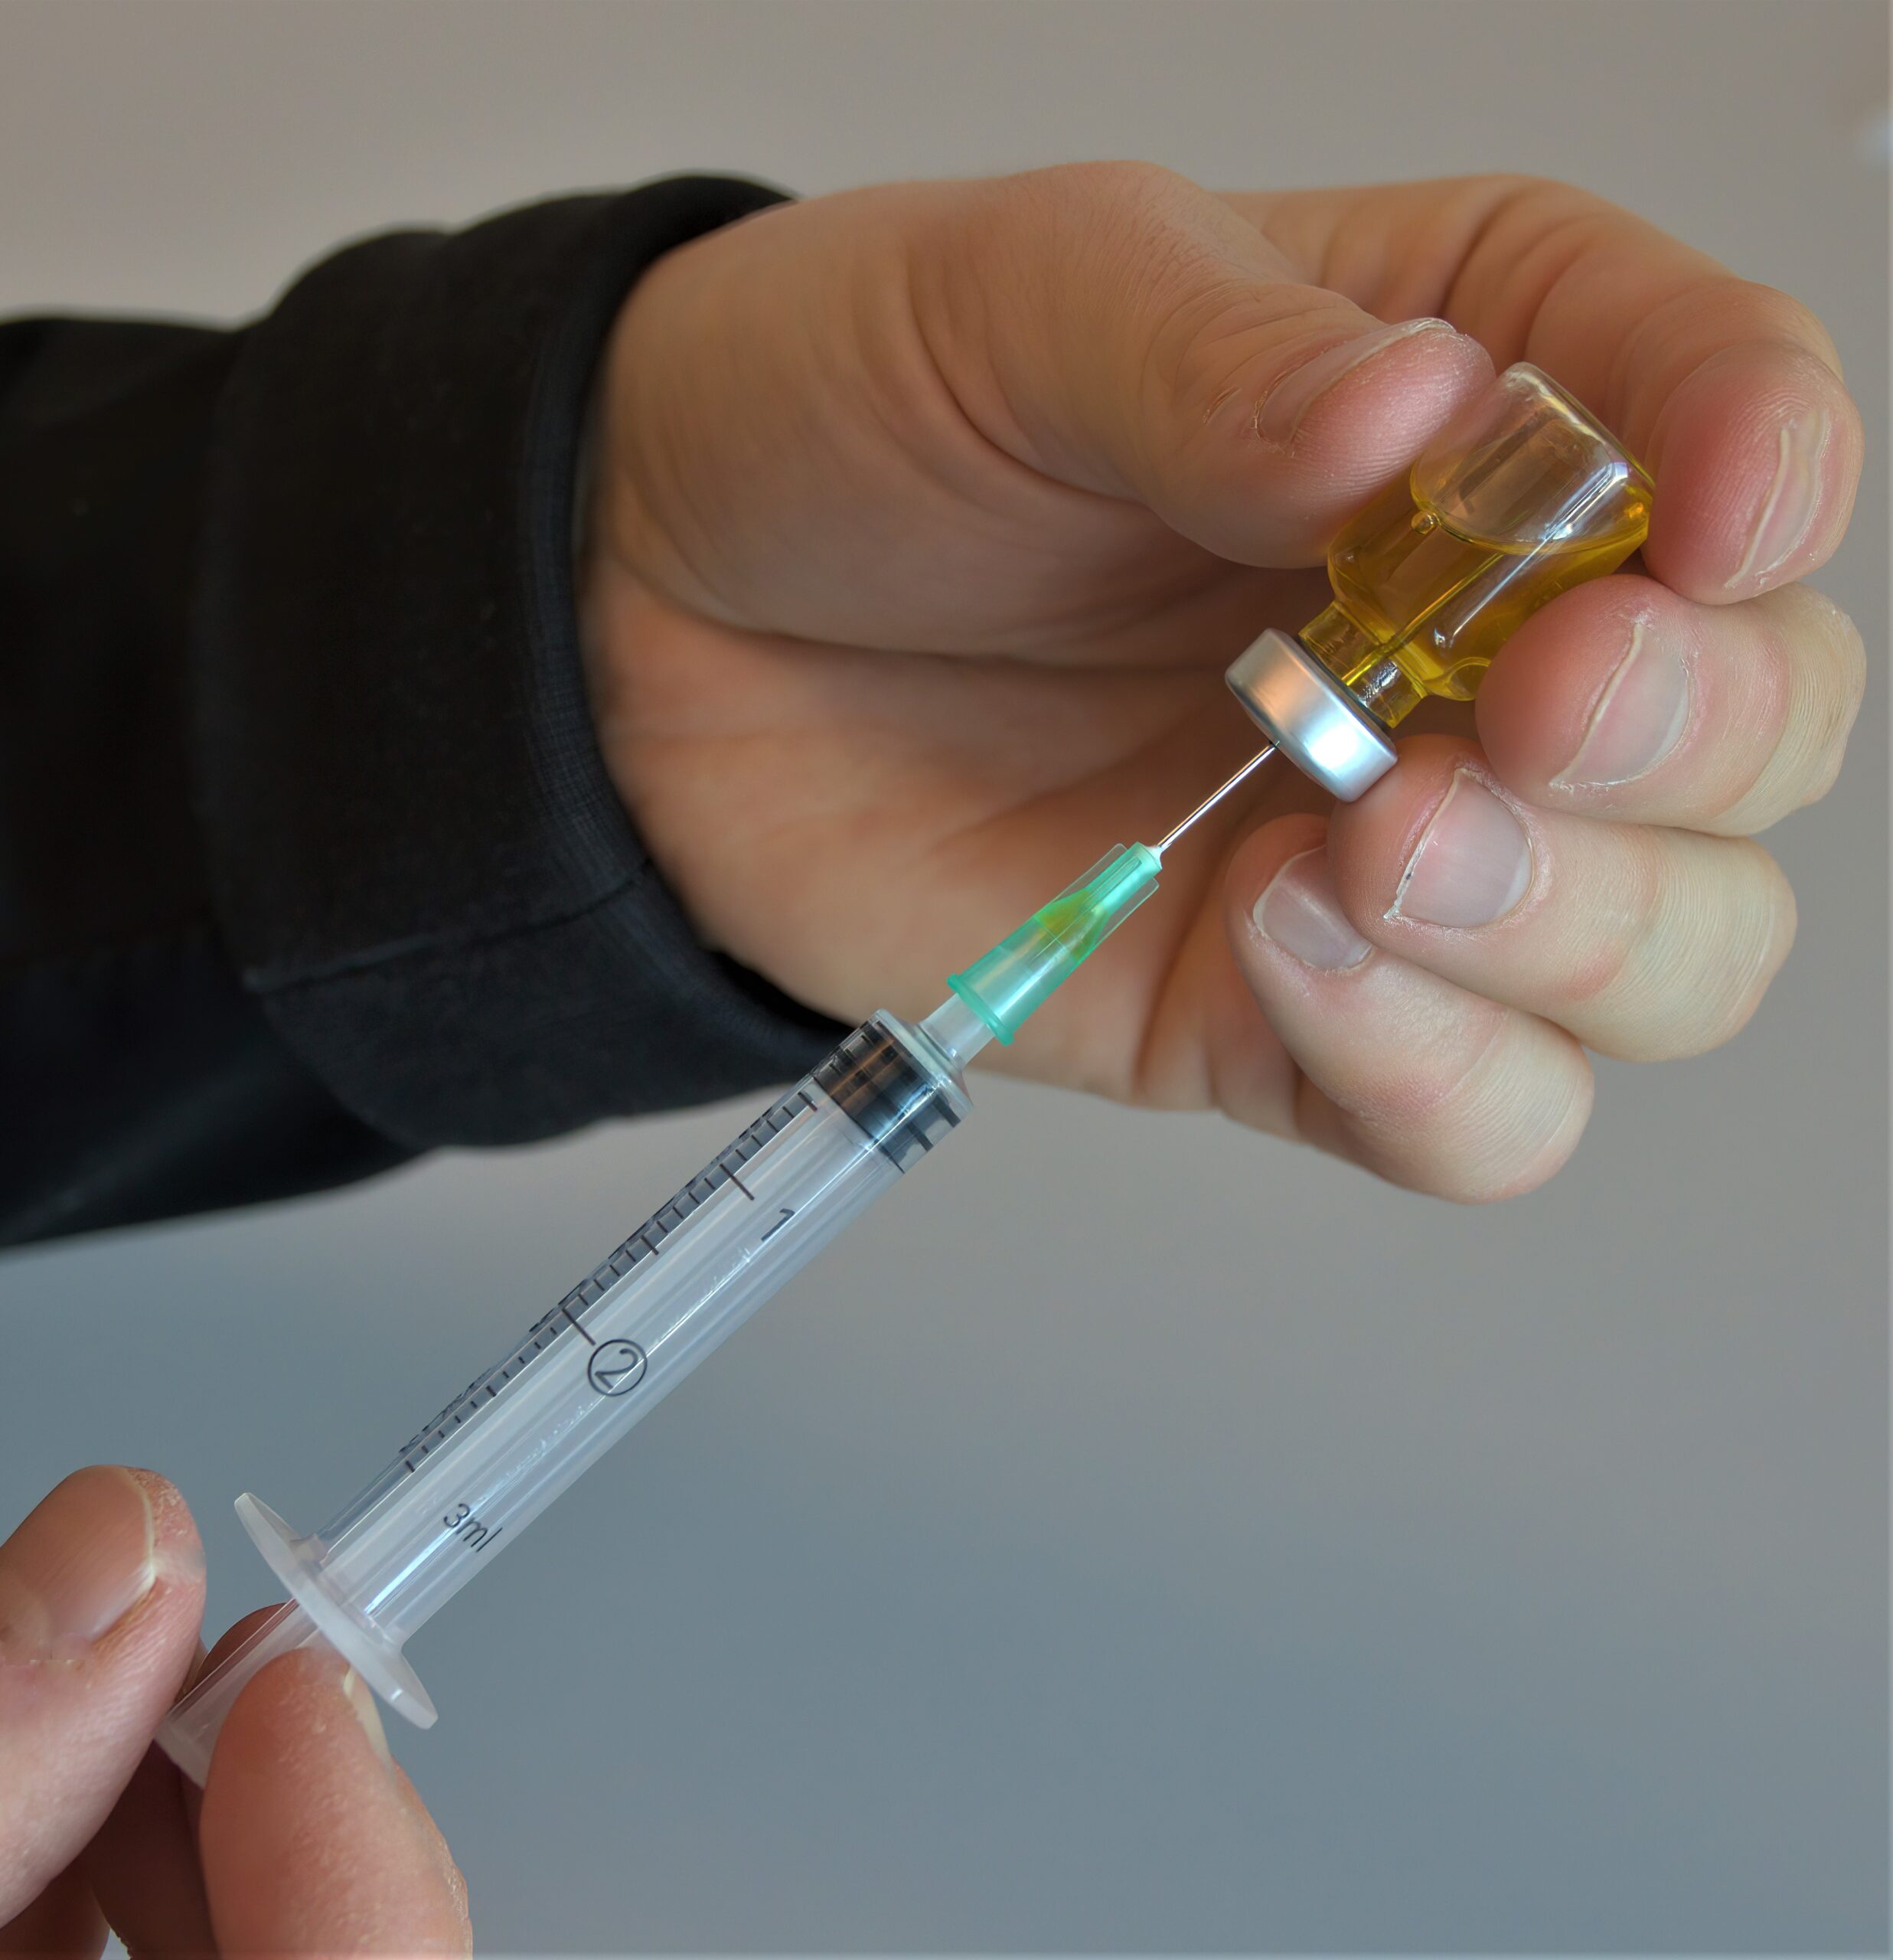
Picture: Drawing the substance from a vial.
6. Hold the syringe upright (needle up) and tap it with your finger so that any air bubbles rise to the top of the syringe. Gently push the plunger to get the air out of the syringe. Small air bubbles are not a problem.
7. Remove the needle and put it in the biohazard container.

Picture: Putting the needle in a biohazard container.
8. Put a new, sterile injection needle that is a suitable size for injecting into the syringe.

Picture: A needle ready for use.
Please note: Keep the needle cover in place until you are ready to inject.
A 38–50 mm/ 1,5–2″ long needle is often suitable. There are two insertion points in the buttock muscle:
1. Ventrogluteal muscle (gluteus medius and gluteus minimus).
2. Dorsogluteal muscle (upper outer quarter of the gluteus maximus).
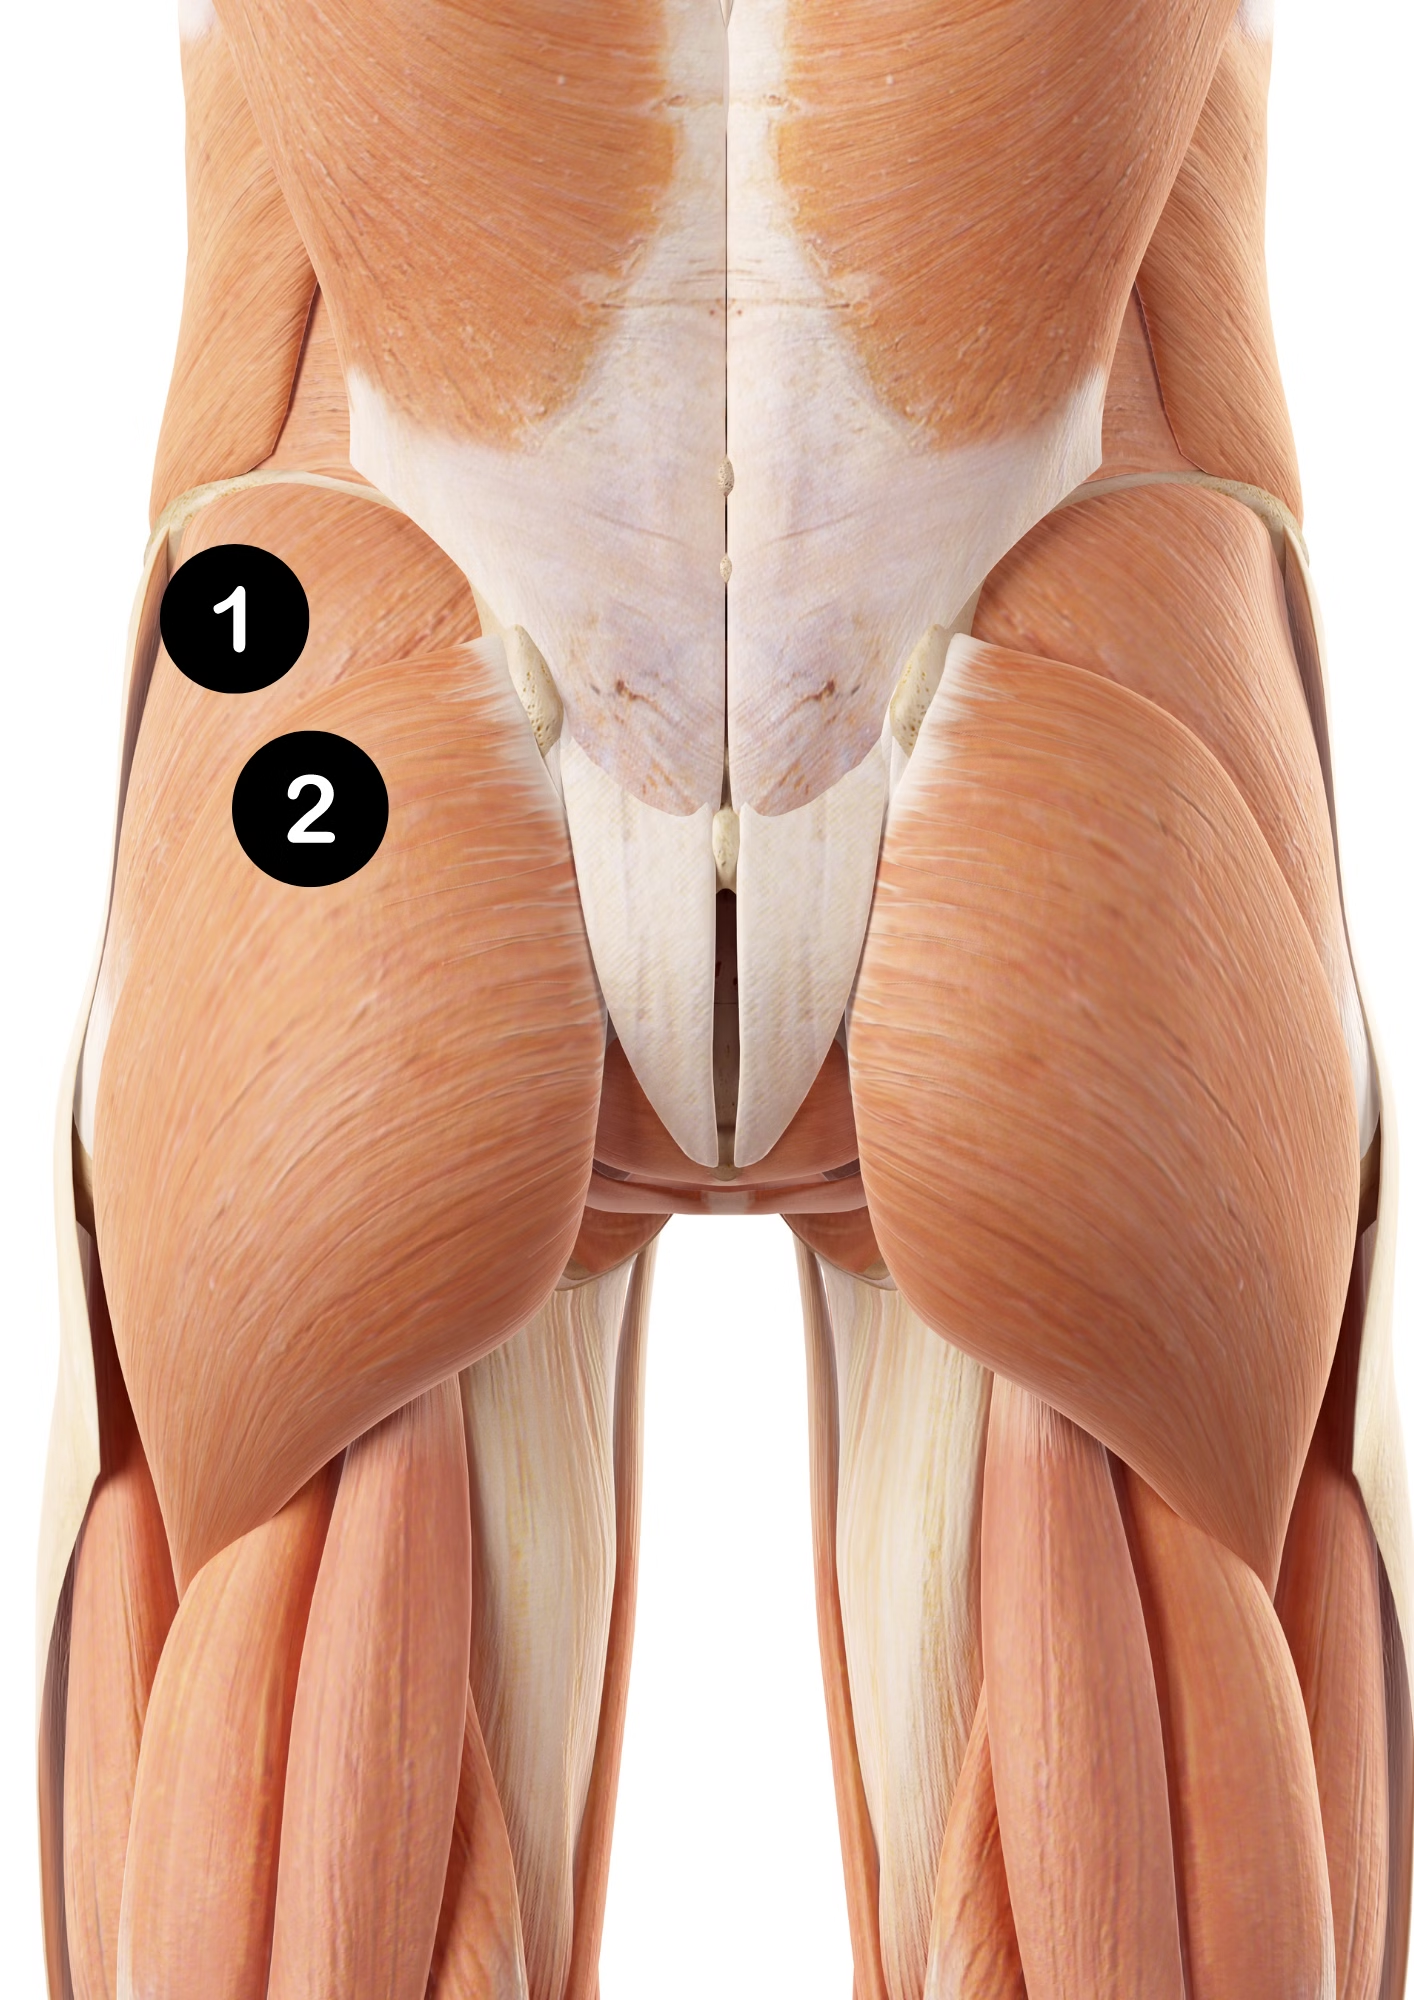
Picture: Two injection sites in the glutes.
If you inject the substance standing up, make sure the muscle is relaxed. Place your weight, for example, on the other hip for the duration of the injection. You can also inject the substance while lying on your side or sitting down. It is important that the buttock muscle is relaxed.
1. Ventrogluteal muscle
The injection is inserted into the gluteus medius or the small gluteus minimus below it.

Picture: Ventrogluteal injection site, the gluteus medius from the side and back.
Favour this site, as it is the safest place to inject. The risk of injecting into large nerves or veins in this area is low. This is a thick muscle and there is often little adipose tissue in this area. It is also the least painful site to inject.
Please note: Locating the right place can be tricky at the beginning. You can ask another person to help you locate the right spot.
How do I locate the right spot?
With the help of another person
Use your bones as landmarks to locate the spot. Ask the other person to place their palm (left hand on the right hip or right hand on the left hip) where the femur meets the pelvis, at the hip joint (greater trochanter) (1).
They should place their index finger on the bony part on the front of the pelvis, which is the anterior superior iliac spine (2). They should then spread their other fingers towards the top of your pelvis (3). Their thumb should now be pointing towards your groin. The injection site is the V-shaped area between the fingers.
By yourself
Find the greater trochanter of your thigh bone (femur) (1). Then find on your pelvis the anterior superior iliac spine (2) and the iliac crest (3) with your fingers – in other words, the highest and frontmost bony part of the pelvis. The injection site is the triangle formed by these three points.
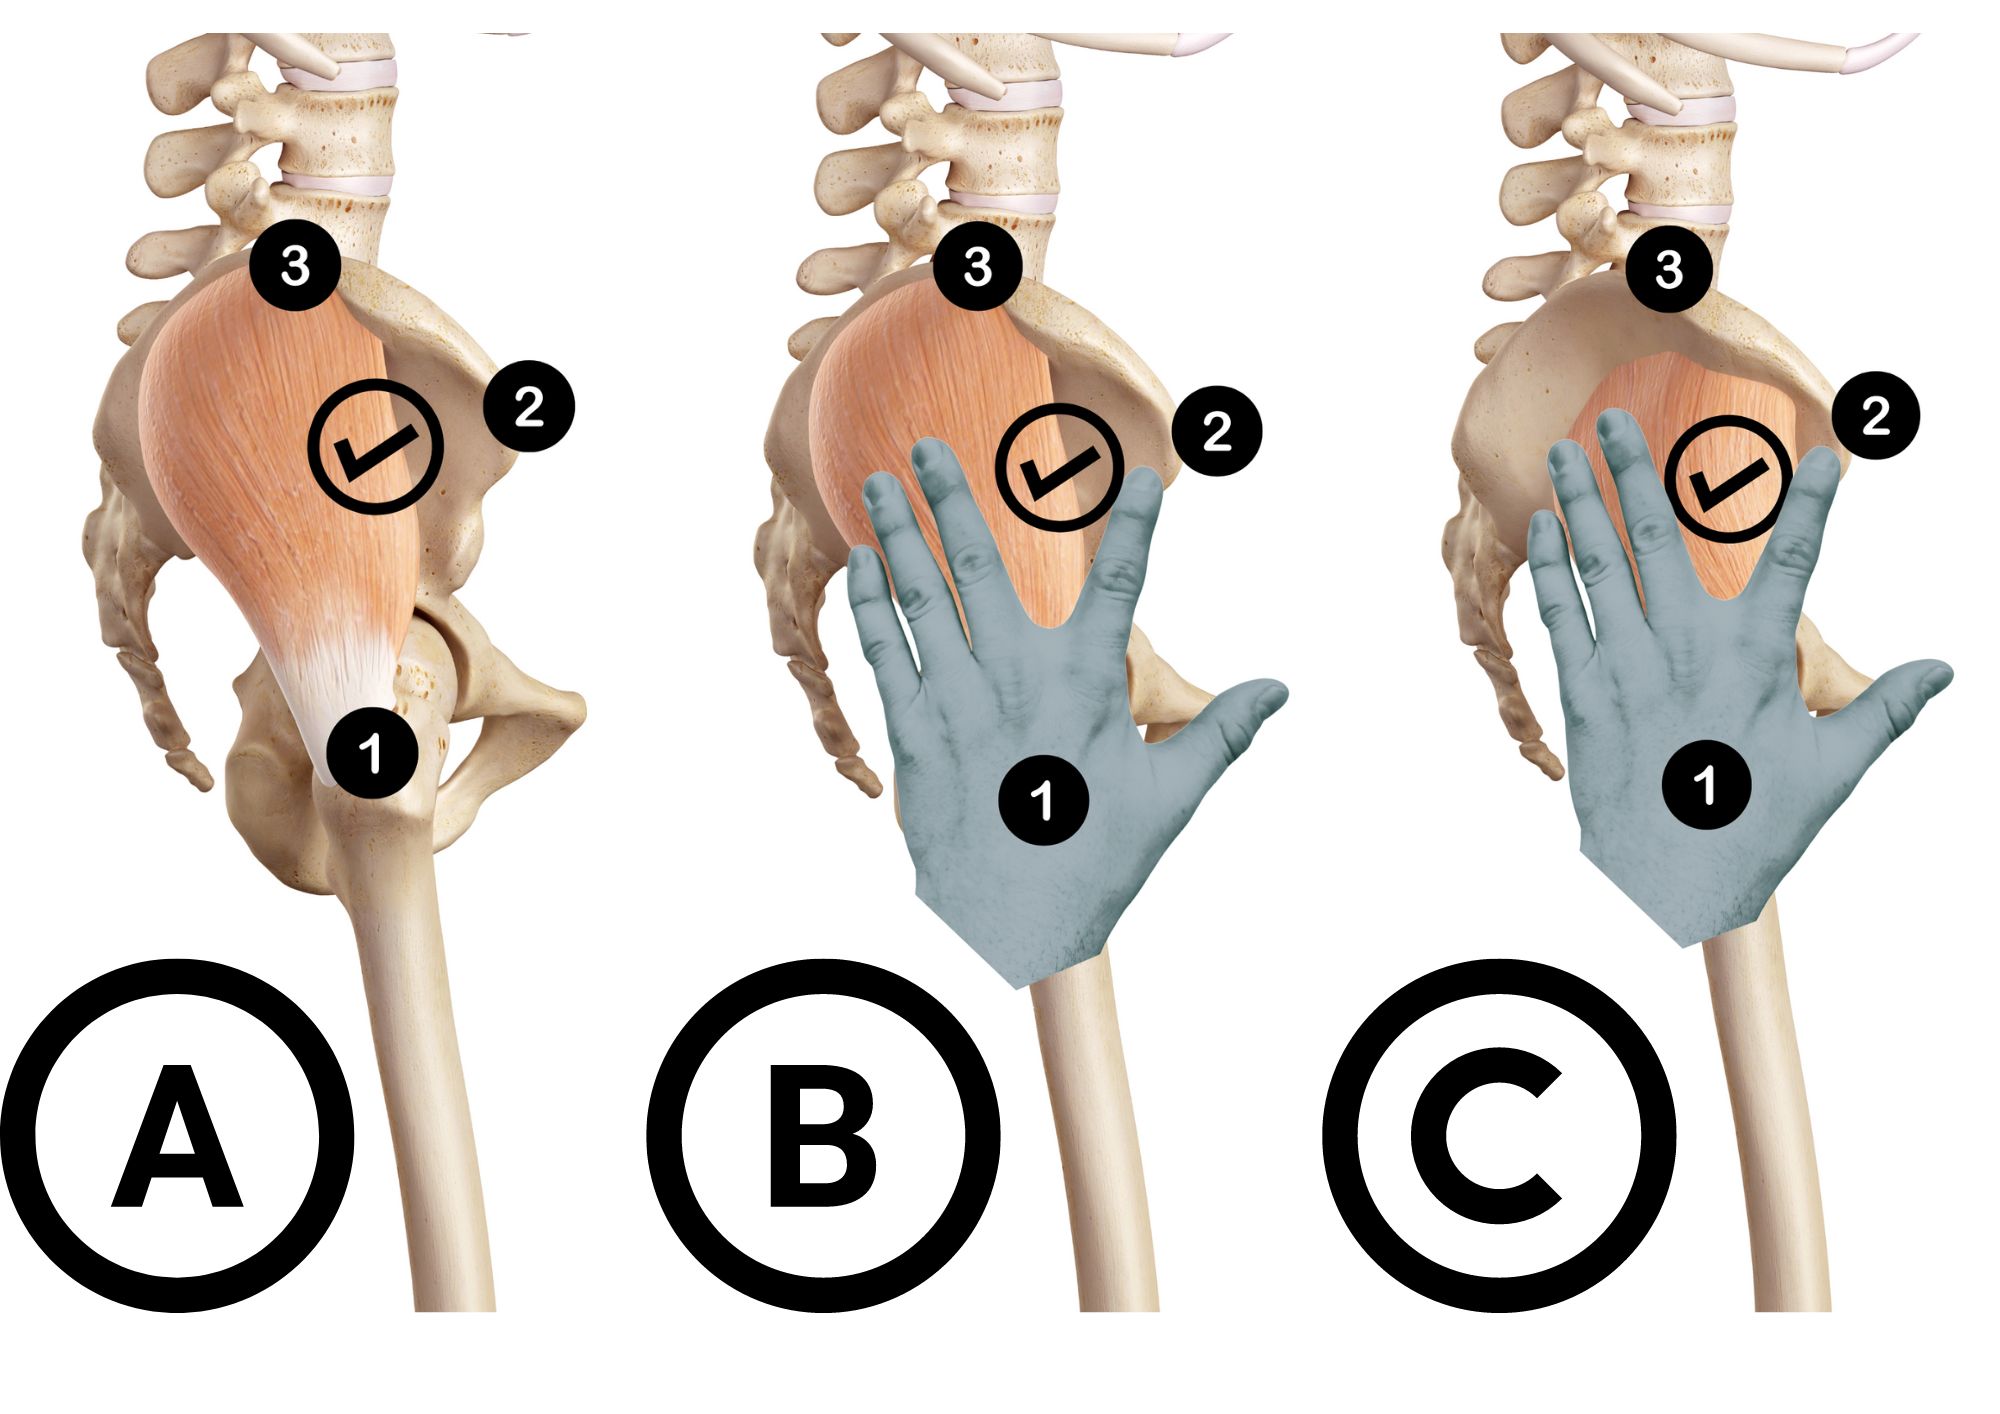
Picture: A) Bone landmarks: 1. The greater trochanter of the femur, 2. Anterior superior iliac spine, 3. Iliac crest. B) Injection site in the gluteus medius C) Injection site in the gluteus minimus, under the gluteus medius.
2. Dorsogluteal injection site, i.e. the upper outer quarter of the gluteus maximus
This is a very common injection site, though it is not the best choice. The upper outer quarter of the gluteus maximus has more adipose tissue and there is a greater risk of hitting the sciatic nerve and large veins, which may result in death. Hitting the sciatic nerve causes severe pain and can lead to paralysis. Avoid this injection site if possible. If you decide to inject here, make sure to choose a needle that is long enough since there is more adipose tissue in this area!

Picture: The upper outer quarter of the buttock, the gluteus maximus injection site.
A 25 mm/ 1″ needle is usually suitable for this injection site. The muscles in the thigh are suitable and safe injection sites when you perform the injection yourself. However, injecting in the thigh may feel uncomfortable. The risk of hitting a nerve or vein is low. There is usually little adipose tissue in this area, which makes it easy to inject into the muscle.
The outer thigh muscle (vastus lateralis) is located on the outside part of the front of the thigh. We recommend you favour this injection site.
You can also inject into the rectus femoris muscle, located in the front of the thigh. However, injecting here may cause more pain and discomfort. You should also be aware that there are bigger veins and nerves located close by in the inner thigh.

Picture: Injection sites on the vastus lateralis muscle (outer thigh) and the rectus femoris muscle (front of the thigh).
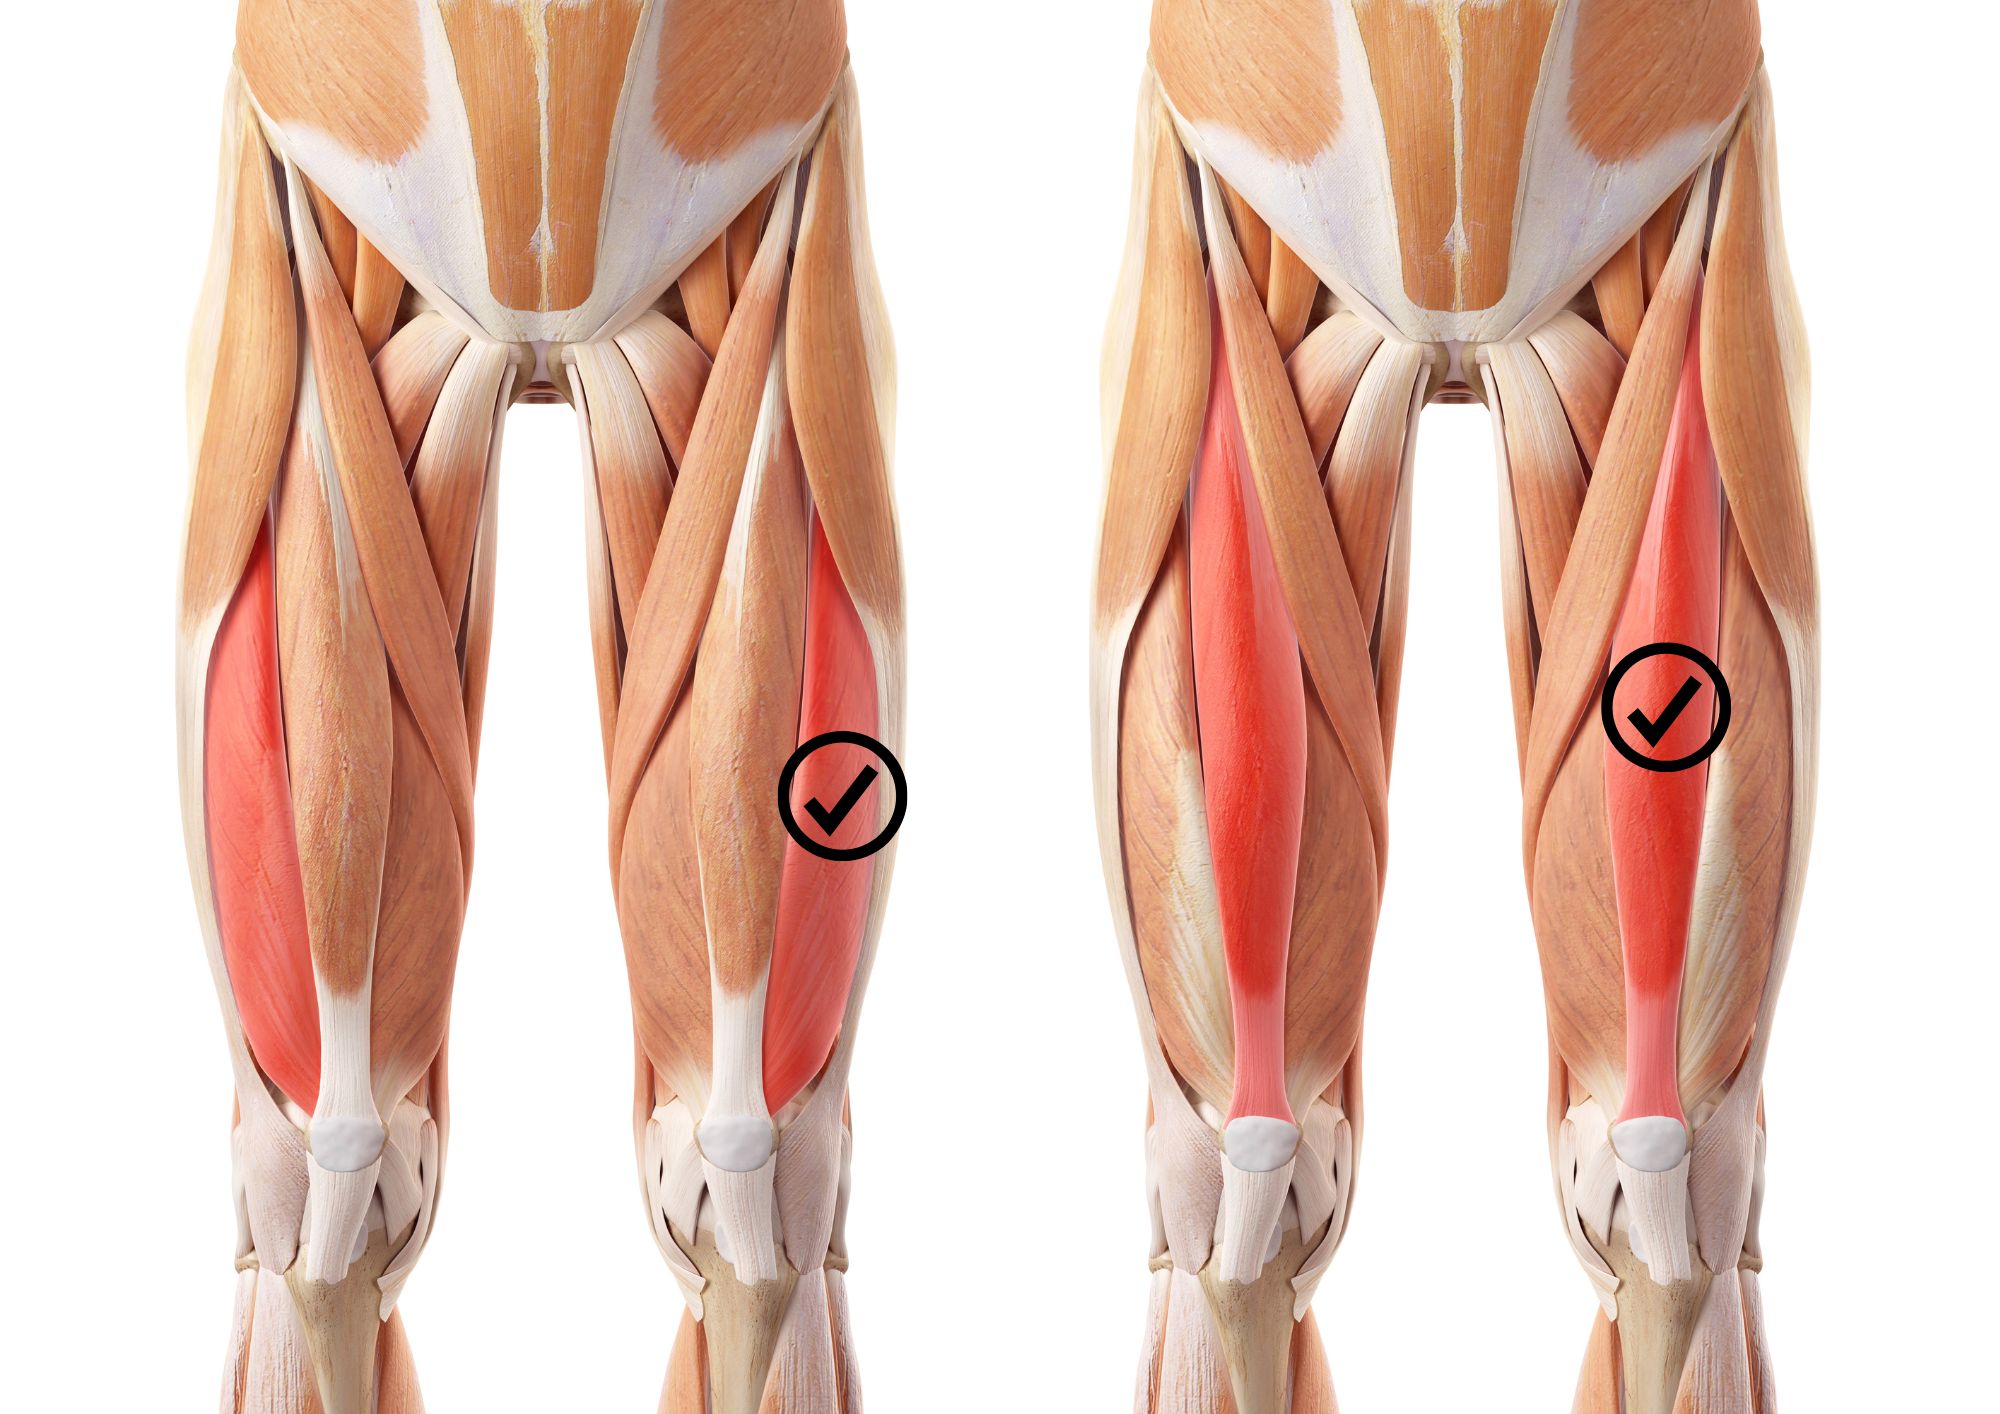
Picture: Injection sites on the vastus lateralis muscle (left) and the rectus femoris muscle (right).
A 25–38 mm/ 1–1,5″ long needle is usually suitable for this injection site. The shoulder muscle (the deltoid) is notably smaller than the muscles in the buttocks or the thigh. Make sure you locate the right spot carefully, because there are veins and nerves in this injection site.
Inject a smaller amount into the deltoid (about 1 ml at a time) in the middle of the muscle.

Picture: The injection site in the deltoid.
Finding the right spot
Find the bony protrusion in the middle upper part of your shoulder muscle with your fingers. This protrusion, known as the acromion, is clearly discernible as a bony spot in the middle upper part of the muscle. Place your index and middle finger on the acromion so that your index finger covers it. The injection spot is slightly below your middle finger, in the middle of your shoulder muscle. Please note: Do not inject in between the acromion and the end of the humerus.
Pay attention to what you are doing and try to stay relaxed. Relax the muscle to be injected.
1. Clean the injection site with an alcohol swab. Make sure the skin is dry before you inject to avoid a stinging and smarting sensation. You can also clean the injection site with soap and water.
2. Don’t remove the needle cover until just before injecting.
3. Fill the needle with the solution by drawing on the plunger carefully.
4. Hold the needle like a dart. Insert the needle through the skin into the muscle at a 90-degree angle. The movement should be quick but controlled.

Picture: Hold the needle like a dart and inject at a 90-degree angle.
5. Do not inject the whole needle inside the tissue; instead, leave one third of it visible outside the tissue. If the needle breaks, this will make it easier to remove it.
6. The needle should reach the muscle when injecting.
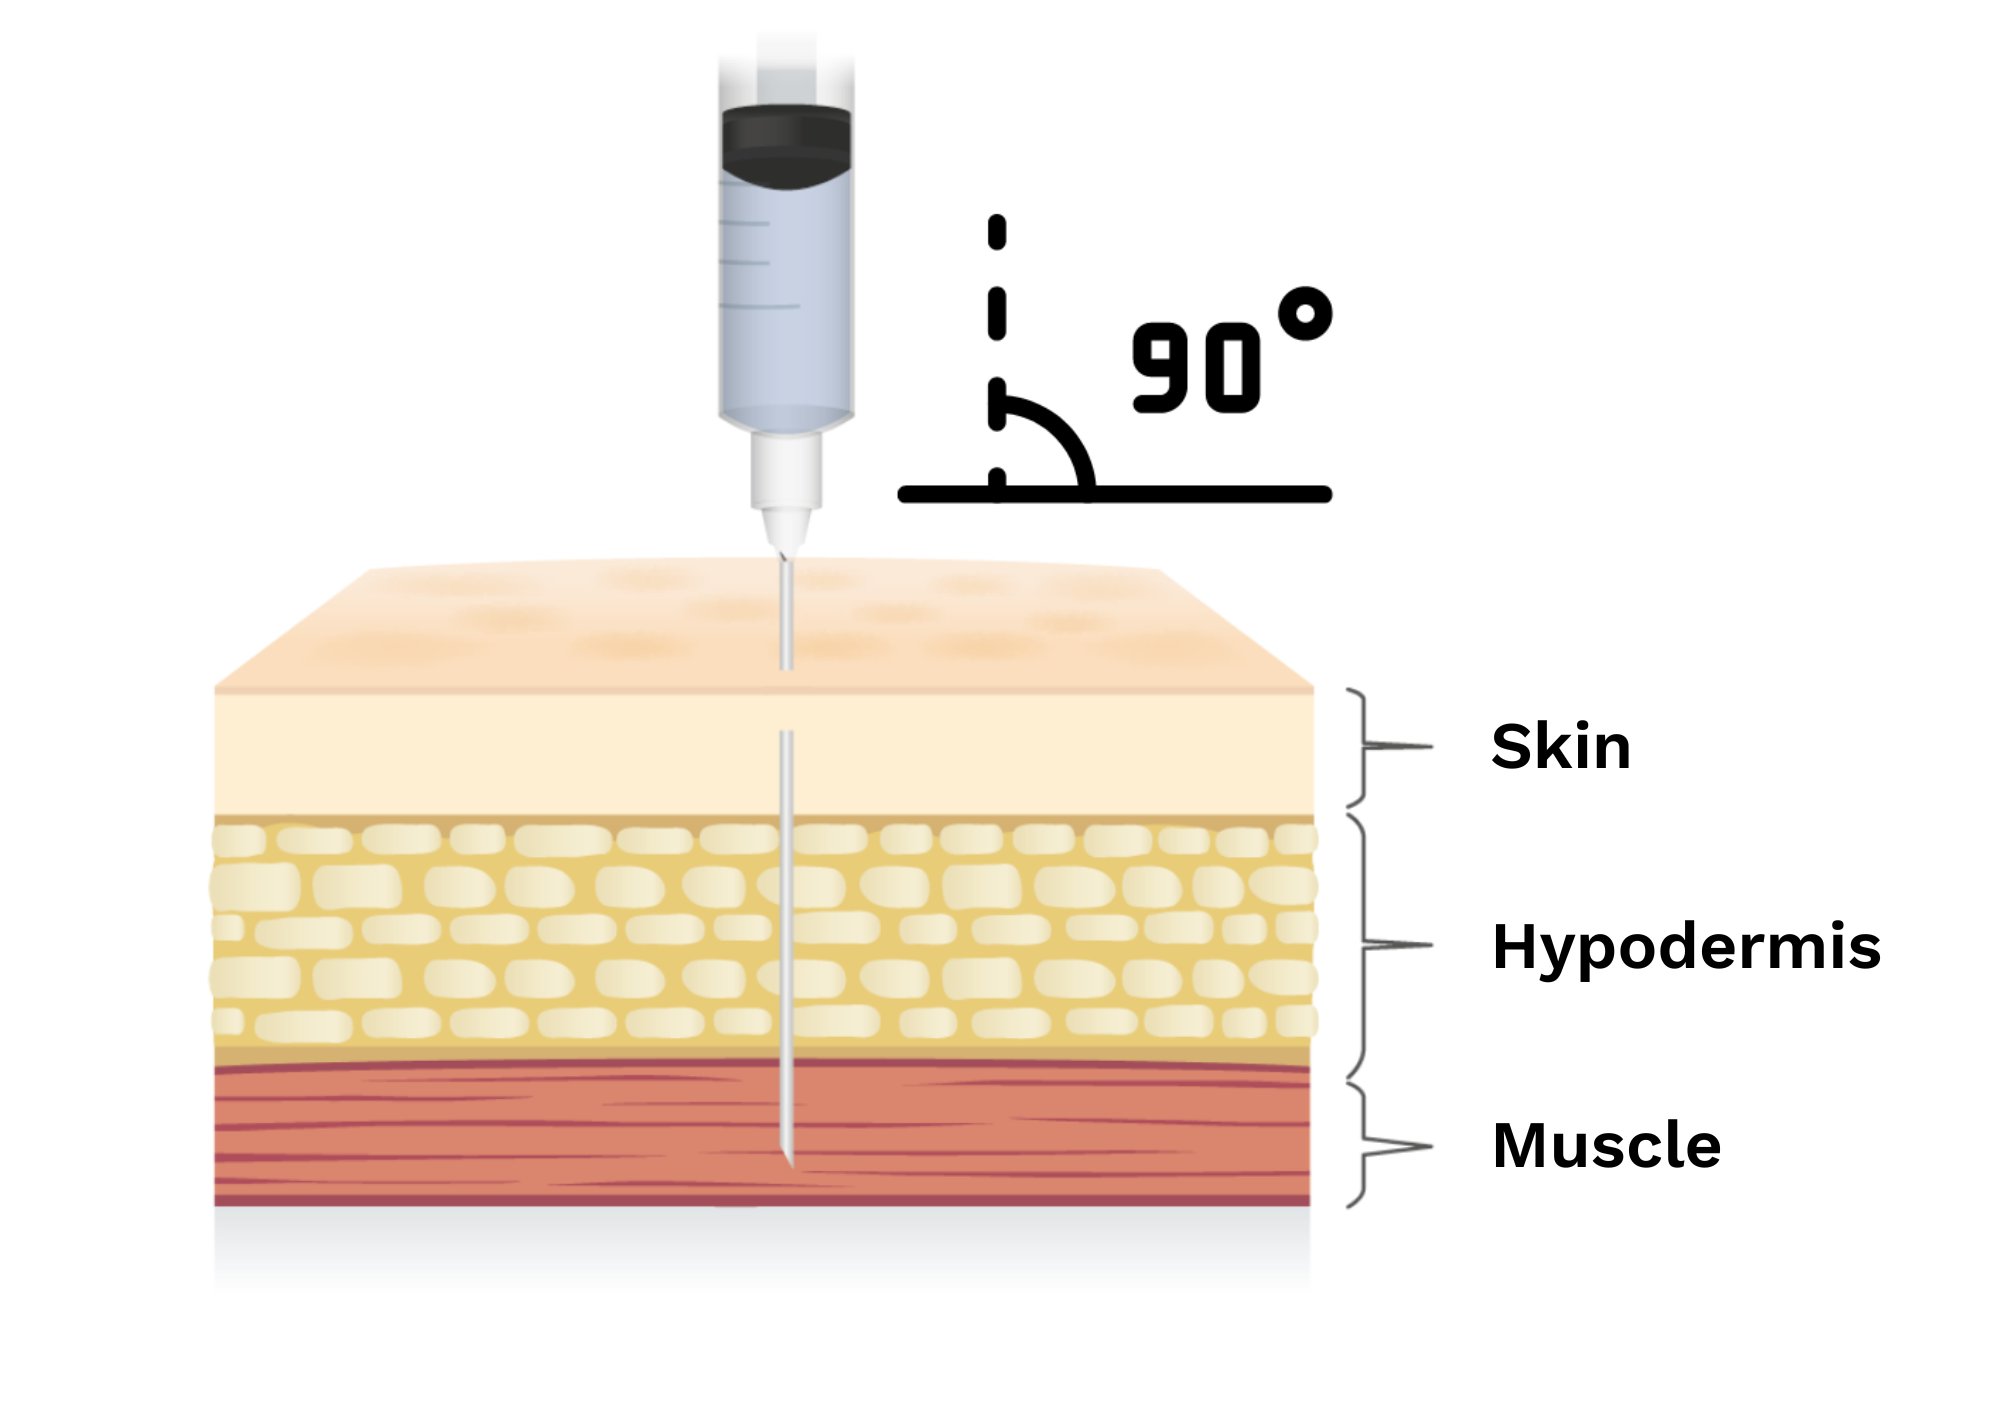
Picture: A needle designed for muscle injection should reach the muscle. Inject at a 90-degree angle and leave about one third of the needle visible outside the tissue.
7. Draw the plunger back slightly and slowly (5–10 seconds) and check that there is no blood in the syringe.
If there is blood, this means that the tip of the needle has penetrated a vein. Pull the needle out, change it and start over.
Please note: If drawing the plunger back slightly to check for blood in the syringe feels difficult or painful, you can skip this step. If you follow the steps in this guide, the risk of hitting a vein should be small. However, if you are injecting into the upper quarter of the gluteus, we recommend drawing the plunger back slightly to check for blood due to the proximity of large veins.
8. If you feel severe pain, it is likely that you have hit a nerve. Pull the needle out.
9. Avoid moving the needle in the muscle during the injection.
10. Push the plunger down slowly, 1 ml per 10 seconds at most.
11. Wait 5 to 10 seconds before pulling the needle out. This improves the absorption of the substance and reduces the reflux.
12. Then quickly pull the needle out.
13. Place the used injection tool straight in the biohazard container.
14. Apply pressure on the injection site for a few minutes with a clean cloth or a piece of cotton wool.
A tip! When injecting into your buttock or thigh muscle without anyone to help, you can apply the Z-track method. If someone else is injecting for you, the same method can be used on the shoulder muscle. The Z-track method reduces the amount of the solution leaking out of the muscle tissue.
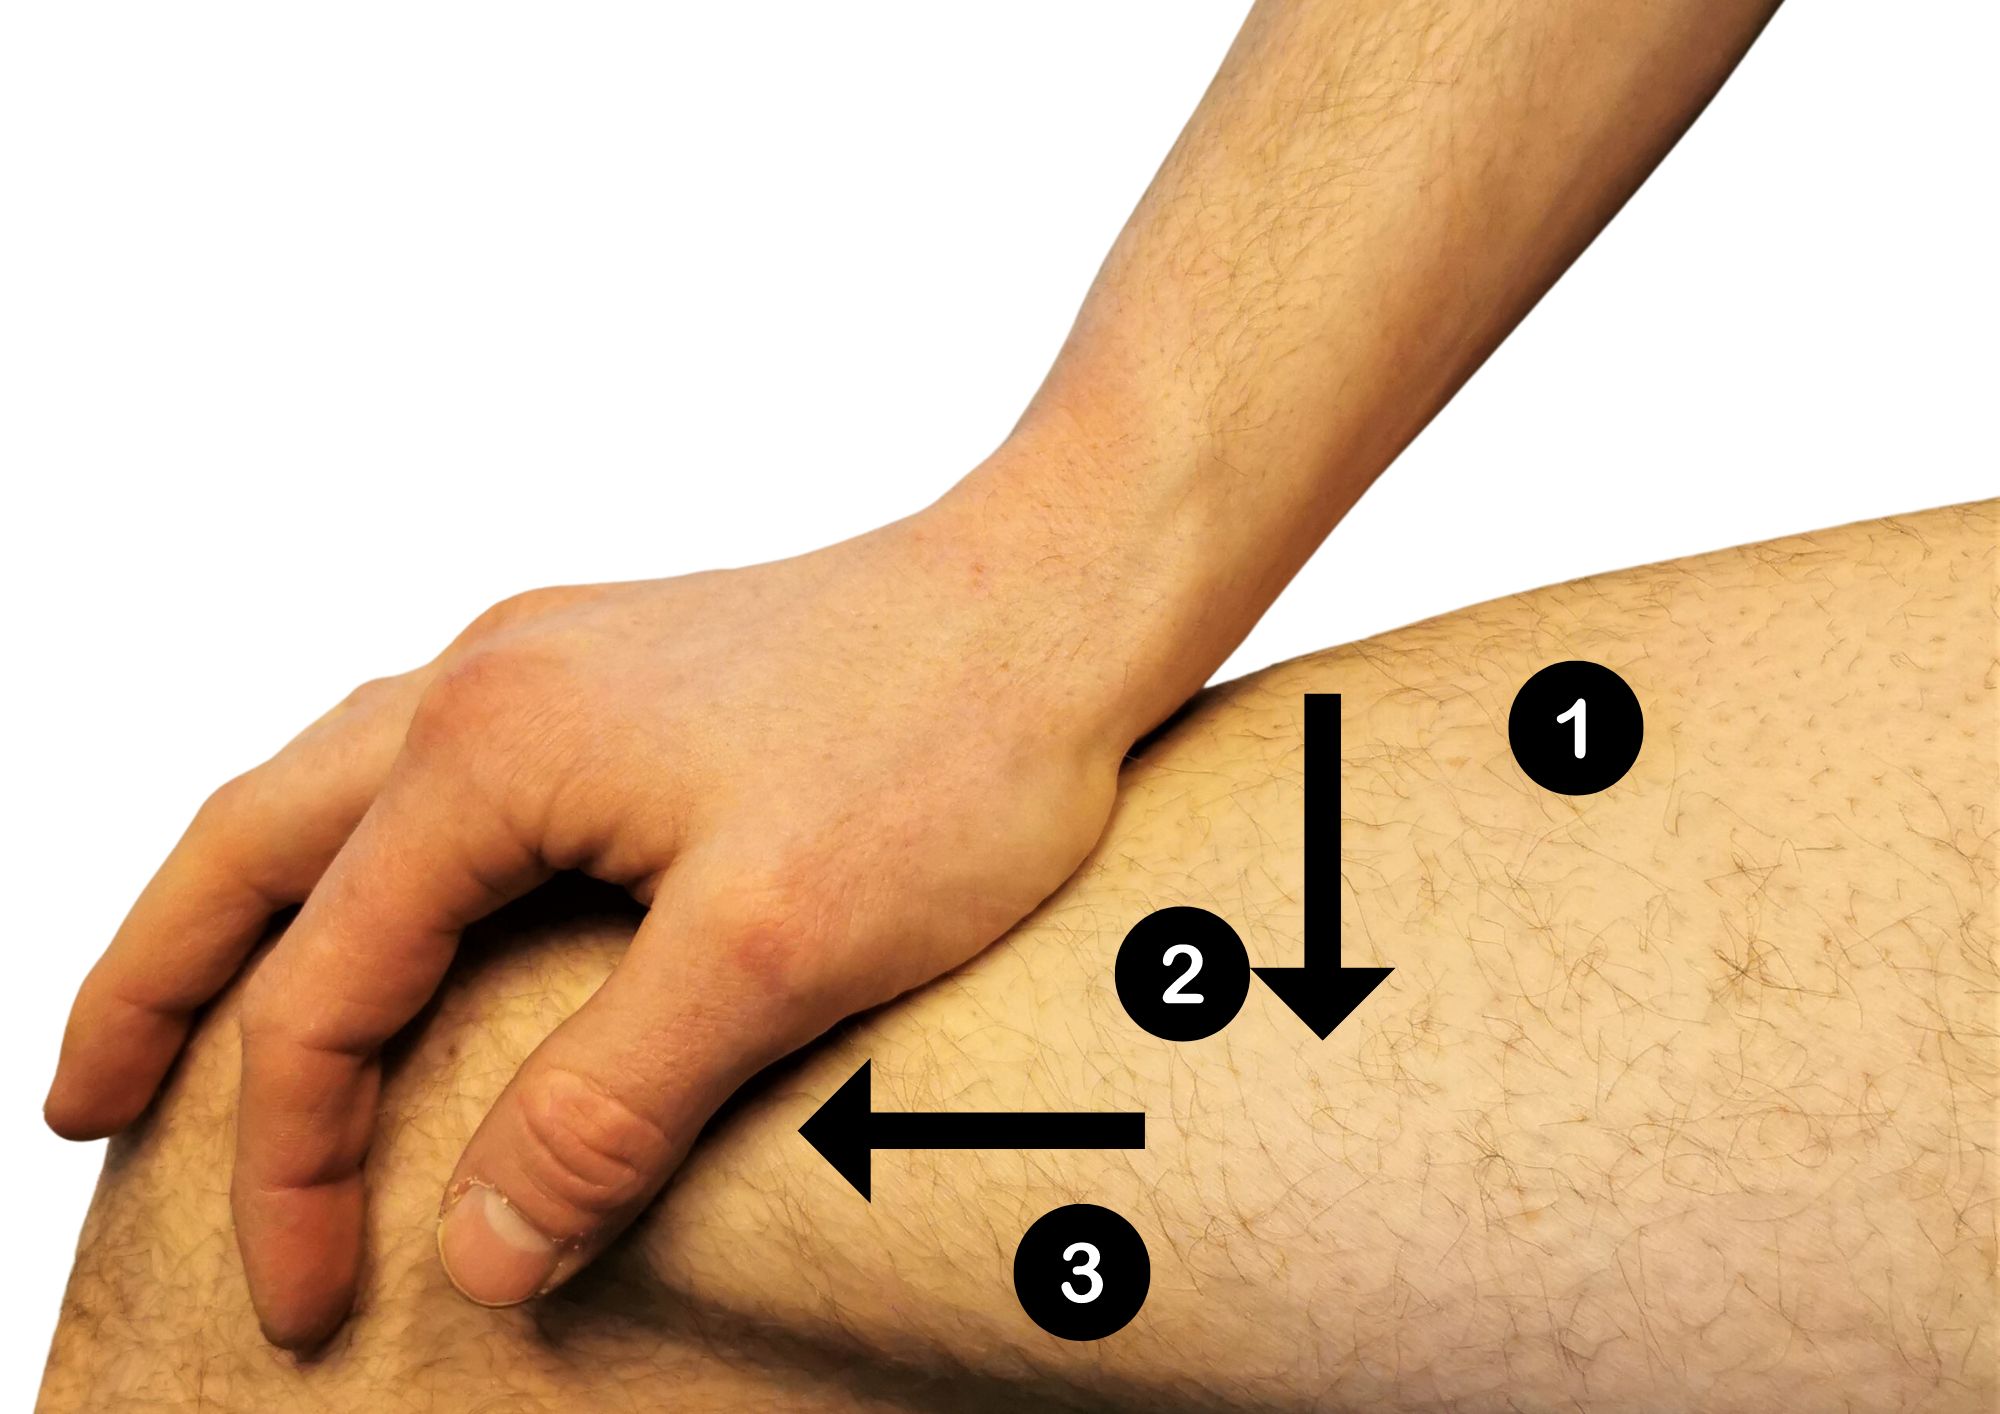
Picture: Using the Z-track method on the outer thigh muscle (vastus lateralis). The injection point (1); press (2) and pull (3) the skin away from the injection point.
- With your free hand, press and pull the skin away from the injection point.
- Keep pulling on the skin until the injection is complete.
- Continue pulling on the skin until you have pulled the needle out.
- Apply pressure to the injected spot with a clean piece of tissue to prevent the injection fluid from leaking out of the muscle. Doing this can also reduce skin irritation.
- If using the Z-track method, do not rub the injection site after the injection.
Make sure to put all the used needles, syringes and other equipment into the biohazard container. Return the used instruments to a pharmacy or a needle and syringe exchange point. When finished, wash your hands with soap. It is normal for the injected spot to bleed a little. Applying pressure on the injection site with a clean cloth should help to stop the bleeding.
Pain and itching at the injection site are also common and harmless and should go away in a few days.
Please note: All injectable, oil-based products can sometimes cause microembolization. This is a condition which involves small particles getting into the bloodstream or the lungs, causing symptoms either during or after the injection. These symptoms may include coughing, shortness of breath, constriction in the throat, chest pain, nausea, sweating, dizziness or even passing out. These symptoms usually last from a few minutes to half an hour and usually go away by themselves. You can decrease this risk by using an appropriate technique and following the instructions given when injecting. If you are not feeling better shortly, seek assistance from a healthcare professional.
- Campbell J, Llewellyn W, van de Ven K, Preston A. 2019. A pocket guide to steroids + other drugs used to enhance performance and image. Published by Exchange Supplies, Australia
- Campbell J. 2017. Reducing Harm for People who Inject Drugs. NHS Greater Glasgow & Clyde
- Coskun H, Kilic C, Senture C. The evaluation of dorsogluteal and ventrogluteal injection sites: a cadaver study. J Clin Nurs. 2016;25(7-8):112-9
- Exchange supplies. Injecting anabolic steroids, step-by-step visual guide. Version 2.0, print date 04/2014. Linnell publications
- Feetam C, White J. Guidance on the Administration to Adults of Oil-based Depot and other Long-Acting Intramuscular Antipsychotic Injections. 2016, 5. painos
- Gilroy A, MacPherson B, Ross L. 2009. Atlas of Anatomy, Latin Nomenclature. Thieme
- Gutierrez J, Munakomi S. 2021. Intramuscular injection. Stat Pearls Publishing
- IPED Info. Public Health Wales.
- Kluger N. Is it safe to vaccinate within a tattoo? 2021. Ann Dermatol Venereol
- Leeds, Grenville & Lanark District Health Unit. 2018. Anabolic steroids-roids-slop-juice-sauce
- Lääketietokeskus. Lääkeinfo.fi. Deca-Durabolin injektioneste, liuos 50 mg/ ml
- Lääketietokeskus. Lääkeinfo.fi. Nebido injektioneste, liuos 1000 mg/4 ml
- Lääketietokeskus. Lääkeinfo.fi. Sustanon 250 injektioneste, liuos
- Mraz M, Thomas C, Rajcan L. Intramuscular injection CLIMAT pathway: a clinical practise guideline. Brit J Nursing. 2018:27(13);752–756
- Ottawa Public Health. 2013. Anabolic steroids, roids/slop/juice/sauce, Whatever you’re calling it, you should know the basic facts on safer injecting
- Pastuszak A, Hu Y, Freid J. Occurrence of pulmonary oil microembolism after testosterone undecanoate injection: A postmarketing safety analysis. 2020:8(2);237-242. Sexual Medicine
- Rodger M, King L. Drawing up and administering intramuscular injections: a review of the literature. J Adv Nursing. 2000:31(3);574–582
- Saano S, Taam-Ukkonen M. Lääkehoidon käsikirja. Sanoma Pro oy. 2018, 7.–8. painos
- Sisson H. Aspirating during the intramuscular injection procedure: a systematic literature review. J Clin Nurs. 2015:24(17–18);2368–2375
- Taam-Ukkonen M, Saano S. Turvallisen lääkehoidon perusteet. Sanoma Pro oy. 2020, 11.–14. painos
- William Llewellyn. 2011. William Llewelyn’s ANABOLICS. E-Book edition. Molecular Nutrition
Joni Askola, Master of Health Science, Dopinglinkki

Like, share